Cleaning microscope lenses is a delicate process, as the quality of the optics can be affected by improper cleaning techniques or the use of inappropriate materials. Here’s a guide on what to use and why when cleaning microscope lenses:
| Image | Product | Detail | Price |
|---|---|---|---|
 | Carson MicroBrite Plus 60x-120x LED Lighted Pocket Microscope |
| See on Amazon |
 | Elikliv LCD Digital Coin Microscope |
| See on Amazon |
 | AmScope M150 Series Portable Compound Microscope |
| See on Amazon |
 | PalliPartners Compound Microscope for Adults & Kids |
| See on Amazon |
 | Skybasic 50X-1000X Magnification WiFi Portable Handheld Microscopes |
| See on Amazon |
Materials Needed:
- Lens Tissue or Microfiber Cloth:
- Why: Lens tissue and microfiber cloths are designed to be gentle on optical surfaces. They won’t scratch the lens and are highly effective at removing fingerprints, oils, and dust.
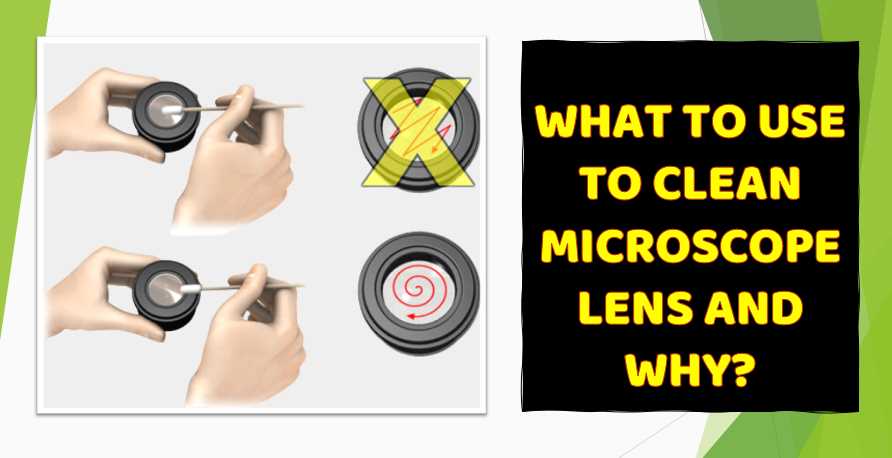
- How to Use: Gently wipe the lens in a circular motion, starting from the center and moving outward. Use a fresh piece of lens tissue or a clean section of the microfiber cloth for each cleaning.
- Lens Cleaning Solution:
- Why: A lens cleaning solution is designed to effectively remove smudges and other residues without damaging lens coatings.
- How to Use: Apply a small amount of the solution to the lens tissue or directly onto the lens. Avoid excess liquid to prevent it from seeping into the lens housing. Wipe the lens gently as described above.
- Compressed Air or Blower Bulb:
- Why: To remove loose dust and debris before using cleaning materials.
- How to Use: Blow air across the lens surface using a blower bulb or compressed air. This helps prevent scratching the lens by removing larger particles before wiping.
- Lens Brush:
- Why: A lens brush can be used to gently sweep away loose particles.
- How to Use: Brush away any loose dust or debris using gentle strokes. This is a good initial step before using lens tissue or a microfiber cloth.
Tips:
- Avoid Household Cleaners and Tissues:
- Household cleaners may contain chemicals that can damage lens coatings. Tissues, paper towels, or clothing materials can scratch the lens.
- Check for Specified Cleaning Instructions:
- Some microscopes may come with specific cleaning instructions from the manufacturer. Always refer to the user manual or contact the manufacturer for guidance.
- Clean Only When Necessary:
- Only clean the lens when it is visibly dirty or smudged. Overcleaning can potentially cause more harm than good.
- Handle with Care:
- When handling microscope lenses, use clean hands or wear lint-free gloves to avoid transferring oils or debris.
- Inspect the Lens After Cleaning:
- Inspect the lens under good lighting conditions after cleaning to ensure that no streaks or residues remain.
Remember that prevention is key, so take measures to minimize the need for cleaning by storing the microscope in a clean environment and handling the lenses with care. If you have any doubts or concerns, it’s always a good idea to consult the manufacturer’s guidelines or seek professional advice.
In this article, I will provide tips on what materials to use and how to use them to clean the microscope lens effectively. Additionally, I will share tips on preventing lens damage and maintaining your microscope’s cleanliness.
What is the best cleaning solution for microscope lenses?


Essential Cleaning Materials
Lens paper is a soft, non-abrasive paper designed to clean delicate surfaces like microscope lenses. It is highly absorbent and does not leave any fibers or residue behind.
Cleaning solution – A specialized cleaning solution is required to effectively remove oils, smudges, and other types of debris from microscope lenses. It is important to use a solution that is safe for use on the lens and will not cause any damage.
Bulb blower – A bulb blower is used to remove any loose debris or dust from the surface of the lens before cleaning. It is a gentle and effective way to clean the lens without risking any scratches or damage.
Brush – A soft-bristled brush can remove any larger debris or particles from the lens before cleaning. It is important to use a brush designed for delicate surfaces to avoid any damage to the lens.
Cotton swabs – Cotton swabs can clean the lens edges and other hard-to-reach areas. Using a clean swab for each area is important to avoid cross-contamination.
Microfiber cloth – A microfiber cloth is a soft, lint-free cloth perfect for polishing and removing any remaining debris or streaks from the lens.
How do you maintain the quality of the lenses of the microscope?
Cleaning microscope lenses is an essential task for maintaining the quality of microscopic images. Here is a step-by-step guide on how to clean microscope lenses.
Step 1: Remove the lens from the microscope
Before cleaning the microscope lens, it is crucial to remove the lens from the microscope to avoid damaging the instrument or other components. Carefully detach the lens from the microscope and place it on a clean, flat surface.
Step 2: Inspect the lens
Once the lens is detached, inspect it for any visible dirt, dust, or smudges. You can use a bright light source to illuminate the lens and observe any visible debris or particles. Make a note of any areas that require special attention.
Step 3: Blow off the debris
Remove any visible debris or dust from the lens surface using a blower brush. A blower brush is a small brush with a rubber bulb that you can use to blast away debris without touching the lens. Be gentle and avoid touching the lens surface with the brush or blowing too hard, which could damage the lens.
Step 4: Apply a cleaning solution
After removing visible debris is time to clean the lens with a specialized cleaning solution. Apply a few drops of the solution on a clean, lint-free, and non-abrasive cloth. Do not use paper towels, tissue paper, or other abrasive materials as they can scratch the lens surface. Be cautious not to apply the cleaning solution directly onto the lens surface to prevent it from seeping into the lens.
Step 5: Wipe the lens
With the cleaning solution on the cloth, gently wipe the lens surface in a circular motion. Do not apply excessive pressure while wiping; it can scratch or damage the lens. Use a new or different part of the same cloth when wiping another section of the lens surface.
Step 6: Repeat the process
Repeat steps 4 and 5 until all visible dirt, dust, or smudges are removed. Removing all the debris on the lens surface may take several wipes.
Step 7: Reattach the lens
Once you have cleaned the lens and are satisfied with the results, reattach the lens to the microscope. Be careful when attaching the lens to avoid scratching or damaging the lens or the microscope.
Precautions to take:
- Avoid touching the lens surface with bare fingers as it can leave fingerprints, which are challenging to remove.
- Do not apply excessive pressure while wiping the lens surface, as it can scratch or damage the lens.
- Use only specialized cleaning solutions and non-abrasive materials like a lint-free cloth or lens-cleaning tissue.
- Avoid using compressed air to blow off debris, as it can spread dust or debris to other components or areas.
- Keep the lens away from direct sunlight, heat, and humidity, as they can damage the lens coating or cause it to fog up.
5 Common Mistakes to Avoid:
- Using paper towels, tissue paper, or other abrasive materials to clean the lens surface.
- Applying too much pressure while wiping the lens surface can scratch or damage the lens.
- Do Not inspect the lens surface for visible debris or particles before cleaning it.
- Applying the cleaning solution directly onto the lens surface, which can seep into the lens.
- Touching the lens surface with bare fingers can leave fingerprints and make it difficult to remove the debris.
You can clean your microscope lenses effectively by following these steps, taking precautions, and avoiding common mistakes.
How can you protect your lens from damage?
Preventing lens damage is essential to maintain the quality of photographs and extend the lifespan of your lens equipment. Here is a step-by-step guide on how to prevent lens damage.
Step 1: Avoid contact with sharp or hard objects
One of the most common causes of lens damage is impact or scratches from sharp or hard objects. To prevent this, always be careful when handling your camera equipment and avoid placing your lenses in areas where they can be bumped or knocked over. Additionally, use protective lens filters or hoods to minimize the risk of damage from accidental impact.
Step 2: Store lenses in a dry and cool environment
Moisture and humidity can cause damage to your camera equipment, including your lenses. Always store your lenses in a dry and cool environment to prevent damage from moisture. Avoid storing them in damp or humid areas such as basements or attics. Also, please do not leave them in direct sunlight or be exposed to extreme temperature changes, which can cause condensation or fogging on the lens surface.
Step 3: Use lens caps and filters
Lens caps and filters are essential accessories for protecting your lenses from damage. Always keep your lenses covered with lens caps when not in use to protect the front and rear elements from scratches, dust, and other debris. Use filters to protect the lens’s front element from scratches and impact damage. UV filters are popular as they reduce haze and protect the lens coating.
Step 4: Clean lenses properly
Proper cleaning is essential to prevent lens damage. Always use specialized cleaning solutions and non-abrasive materials like a microfiber cloth to clean your lenses. Avoid using paper towels, tissue paper, or other abrasive materials that can scratch the lens surface. Additionally, do not apply too much pressure while wiping the lens surface, as it can damage the lens coating or elements.
Step 5: Handle lenses with care
Always hold lenses by the lens barrel and not the focus or zoom rings when handling lenses. Avoid applying excessive force or pressure on the lens elements or rings as it can damage them. Also, be cautious when changing lenses and avoid exposing the lens’s camera sensor or rear element to dust or debris.
Can you use a microfiber cloth to clean microscope lenses?
Yes, a microfiber cloth can be used to clean microscope lenses. Microfiber cloths are generally considered safe for cleaning microscope lenses because they are made of very fine synthetic fibers that are gentle on delicate surfaces and do not scratch or damage the lens. However, it is vital to ensure the microfiber cloth is clean and free from dirt, dust, or debris before cleaning the lens. Additionally, the cloth should be used gently to avoid any accidental damage to the lens.
Is it safe to use alcohol-based cleaning solutions on microscope lenses?
It depends on the type of microscope lens and the concentration of the alcohol-based cleaning solution.
Some microscope lenses have coatings that alcohol-based cleaning solutions can damage. In such cases, avoiding alcohol-based cleaning solutions and using a specialized cleaning solution safe for coated lenses is best.
A diluted alcohol-based cleaning solution can be used if the microscope lens is not coated. However, it is important to use a low concentration of alcohol (such as 70% isopropyl alcohol) and to apply the solution to a cleaning cloth rather than directly to the lens.
It is important to note that excessive use of alcohol-based cleaning solutions can damage the lens over time. Therefore, it is recommended to use alcohol-based cleaning solutions sparingly and only when necessary.
What is the best way to remove oil from microscope lenses?
The best way to remove oil from microscope lenses is to use a specialized cleaning solution to remove oil and fingerprints.
Many commercially available lens cleaning solutions are designed for use on microscope lenses. These solutions are usually alcohol-based and can effectively remove oil and other residues from the lens surface.
To remove oil from the microscope lens, apply a small amount of the cleaning solution to a clean, lint-free cloth or lens-cleaning tissue. Then, gently wipe the lens in a circular motion, starting from the center of the lens and working your way out to the edges. Be sure to use a light touch and avoid applying too much pressure, which can damage the lens.
If the oil is particularly stubborn, you may need to repeat the process several times or use a more aggressive cleaning solution. However, be careful not to overuse cleaning solutions, as excessive use can damage the lens over time.
What is the best way to remove fingerprints from microscope lenses?
The best way to remove fingerprints from microscope lenses is to use a specialized lens-cleaning solution and a clean, lint-free cloth or lens-cleaning tissue.
To remove fingerprints, apply a small amount of the cleaning solution to the cloth or tissue and gently wipe the lens in a circular motion, starting from the center of the lens and working your way out to the edges. Be sure to use a light touch and avoid applying too much pressure, which can damage the lens.
If the fingerprints are particularly stubborn, you can use a lens cleaning pen designed to remove fingerprints and other smudges from lens surfaces. However, be careful not to overuse the lens cleaning pen, as excessive use can damage the lens over time.
It is also important to avoid touching the lens surface with your fingers, as the oils and dirt on your fingers can leave smudges and fingerprints on the lens. If you need to handle the lens, use clean, lint-free gloves to avoid leaving fingerprints.
How often should you clean microscope lenses?
The frequency with which microscope lenses should be cleaned depends on how often they are used and the environmental conditions in which they are used.
As a general rule, microscope lenses should be cleaned before each use to ensure that the lens is free from dust, debris, and other contaminants that can affect the quality of the image. Additionally, if the lens becomes visibly dirty or smudged during use, it should be cleaned immediately to avoid further damage.
If the microscope is used frequently or in a dusty or dirty environment, the lenses may need to be cleaned more often. In such cases, cleaning the lenses daily or even multiple times daily may be necessary to ensure they remain free from contaminants.
It is important to remember that excessive cleaning can damage the lens over time. Therefore, cleaning the lens only when necessary and using a gentle touch when cleaning to avoid causing any accidental damage is recommended.
What is the recommended frequency for cleaning microscope lenses, and how do I determine if cleaning is necessary?
Microscope lenses should be cleaned only when necessary, typically when there are visible smudges, fingerprints, or debris affecting the image quality. Regularly inspect the lenses, and clean them only if contaminants are present.
Can I use household cleaning products or improvised materials to clean microscope lenses?
Using household cleaners or improvised materials for cleaning microscope lenses is not recommended. These substances may contain chemicals that can damage lens coatings. Stick to recommended lens cleaning solutions and specialized cleaning tools.
How should I handle stubborn stains or residues on microscope lenses?
For stubborn stains or residues, use a minimal specialized lens cleaning solution applied to a lens tissue or microfiber cloth. Gently rub in a circular motion and avoid excessive pressure. If the issue persists, consult the microscope’s user manual or the manufacturer for guidance.
Is it necessary to disassemble the microscope or remove lenses for cleaning, or can I clean them while they are in place?
In most cases, microscope lenses can be cleaned while they are in place. It is not recommended to disassemble the microscope unless specified in the user manual or by the manufacturer. Cleaning in place minimizes the risk of damage and misalignment.
Are there specific cleaning techniques for different types of microscope lenses (e.g., objective, eyepiece)?
Yes, different microscope lenses may require slightly different cleaning techniques. Generally, use a blower bulb or compressed air to remove loose dust, a lens brush for larger particles, and a lens tissue or microfiber cloth with a recommended cleaning solution for smudges. Refer to the microscope’s user manual for any specific instructions for different lens types.
FACTS
- According to a study published in the Journal of Microscopy, more than 80% of poor image quality issues in microscopy can be attributed to dirty or contaminated lenses.
- In a survey of microscope users conducted by Olympus, over 70% reported that they frequently clean their lenses, but only 38% reported being satisfied with the cleanliness of their lenses.
- A study by Nikon Instruments found that even small amounts of dust or debris on a microscope lens can significantly reduce image resolution and contrast.
- According to the National Institutes of Health (NIH), cleaning microscope lenses should be a routine part of microscope maintenance, as dirty lenses can lead to inaccurate data and observations.
- The NIH recommends using a soft, lint-free cloth or lens paper to clean microscope lenses, as using harsh chemicals or abrasive materials can damage the lens coating.
- The American Society for Microbiology recommends cleaning microscope lenses before and after each use to ensure optimal image quality and accuracy.
- A study by Leica Microsystems found that proper lens cleaning can increase microscope resolution by up to 20%, resulting in clearer and more detailed images.
- Failure to clean microscope lenses regularly can lead to the buildup of mold, bacteria, and other microorganisms, which can compromise the safety of the user and the accuracy of the data.
- A survey conducted by Zeiss found that approximately 60% of microscope users have experienced difficulties with image quality due to dirty lenses, highlighting the importance of regular cleaning.
- The cost of replacing a microscope lens due to damage caused by improper cleaning can be significant, with prices ranging from hundreds to thousands of dollars depending on the type and quality of the lens.
Final Words
successful microscope lens cleaning is crucial to achieving accurate and high-quality results when using a microscope. Following the seven steps outlined in this guide and taking the necessary precautions, you can effectively clean your microscope lenses without damaging them.
Remember to use the right tools and cleaning solutions, avoid touching the lens surface with your fingers and carefully handle the lenses. By doing so, you can ensure that your microscope lenses remain in excellent condition and continue to provide you with clear and sharp images. With proper cleaning and maintenance, your microscope lenses can last for many years, providing reliable and accurate results.

I am an enthusiastic student of optics, so I may be biased when I say that optics is one of the most critical fields. It doesn’t matter what type of optics you are talking about – optics for astronomy, medicine, engineering, or pleasure – all types are essential.
Last update on 2025-07-03 / Affiliate links / Images from Amazon Product Advertising API
Table of Contents

Pingback: 11 Ways to Clean and Sterilize A Microscope: Video Guide to Follow
Pingback: Which is the Top Picks Microscope for Watch Repair: Video Included
Pingback: A Closer Look at the 144 LED Microscope Ring Light and Adapter: Glowing Precision
Pingback: When Is My Image Blurry in My Microscope?