Binocular is a widespread word, and everyone knows what a Binocular is. But the numbers we see on a binocular or the terminology of a Binocular is relatively unknown for beginners. Even then, The first thing you need to know before buying Binoculars is the significance of the terminology and the numbers we see on it.
Because there are various types of Binoculars, these are made for different kinds of uses. You may want to use them for birding, hunting, astronomy, boating, or wildlife viewing. So, the numbers matter. This article will show you the significance of these numbers. We will show it understandably; thus, you can understand it quickly.
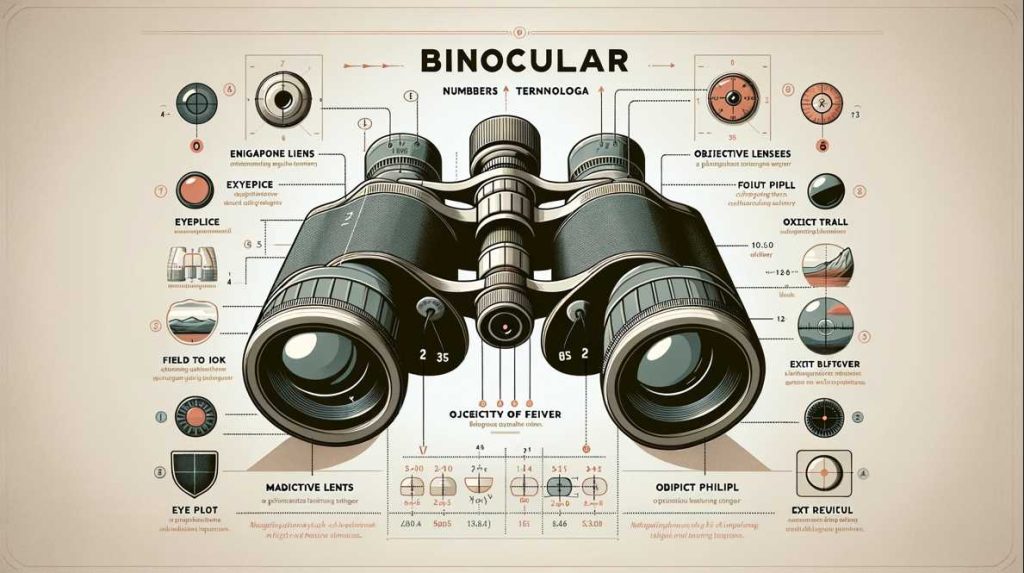
There are many facts to know, like magnification – numbers, size of lenses, viewing angles, exit – pupil – numbers, eye – relief – numbers, the – field – view, and focusing. We will give you the ultimate idea about everything related to numbers and the terminology of a Binocular one by one.
Binocular Numbers and Terminology Explained
Understanding the Magnification
Let’s delve into the fundamental aspect of binoculars—the magnification. Beyond being just a numerical value, magnification is the gateway to a closer, more detailed view of the world.
1. Definition of Magnification: At its core, magnification represents how much larger an object appears through binoculars compared to the naked eye. It’s expressed as a number followed by an ‘x’ (e.g., 8×42), with the ‘8’ indicating that the object will appear eight times closer than it would to the unaided eye.
2. Significance of Magnification in Binoculars: Magnification is a critical factor in choosing binoculars based on your intended use. For general-purpose observations, an 8x magnification is often recommended, providing a good balance between detail and stability. However, if you require more detailed observations, such as wildlife or birdwatching, a 10x or even 12x magnification might be preferable.
3. Common Magnification Numbers and Their Applications: Let’s explore common magnification numbers and their applications through Table 1.
Popular Magnifications and Their Applications
Specifications Overview
| Model | Magnification | Objective Lens Diameter (mm) | Exit Pupil (mm) | Twilight Factor | Perceived Low Light Brightness | Low Light Detail |
|---|---|---|---|---|---|---|
| 8×21 | 8x | 21 | 2.6 | 13 | Adequate | Limited |
| 8×25 | 8x | 25 | 3.1 | 14.1 | Adequate | Limited |
| 10×25 | 10x | 25 | 2.5 | 15.8 | Adequate | Limited |
| 10×26 | 10x | 26 | 2.6 | 16.1 | Adequate | Limited |
| 7×28 | 7x | 28 | 4.0 | 15.4 | Good | Moderate |
| 9×28 | 9x | 28 | 3.1 | 16.7 | Good | Moderate |
| 10×28 | 10x | 28 | 2.8 | 16.8 | Adequate | Limited |
| 8×30 | 8x | 30 | 3.8 | 15.5 | Good | Moderate |
| 10×30 | 10x | 30 | 3.0 | 16.4 | Adequate | Limited |
| 8×32 | 8x | 32 | 4.0 | 16.0 | Good | Moderate |
| 9×32 | 9x | 32 | 3.6 | 16.8 | Good | Moderate |
| 10×32 | 10x | 32 | 3.2 | 17.6 | Adequate | Limited |
| 8×42 | 8x | 42 | 5.3 | 18.3 | Excellent | High |
| 10×42 | 10x | 42 | 4.2 | 20.5 | Good | High |
| 8.5×45 | 8.5x | 45 | 5.3 | 19.5 | Excellent | High |
| 7×50 | 7x | 50 | 7.1 | 18.7 | Excellent | High |
| 10×50 | 10x | 50 | 5.0 | 22.4 | Excellent | High |
| 12×50 | 12x | 50 | 4.2 | 24.5 | Good | High |
| 15×56 | 15x | 56 | 3.7 | 29.4 | Adequate | Limited |
Compact Models (8×21, 8×25, 10×25, 10×26)
- 8×21 – Your On-the-Go CompanionApplications: Ideal for casual use, hiking, and daytime activities.Characteristics: Compact, lightweight, suitable for daylight observations.Considerations: Limited low light performance due to smaller objective lens diameter.Compact models, like the 8×21, are perfect for on-the-go enthusiasts. Their lightweight design makes them versatile for casual observation and hiking. However, be aware of the compromise in low light conditions due to the smaller objective lens diameter.
- 8×25 – Versatility in a Compact PackageApplications: Versatile, suitable for birdwatching and general outdoor activities.Characteristics: Portable, good compromise between size and performance.Considerations: Limited low light detail, better suited for daytime use.The 8×25 configuration strikes a balance between portability and performance, making it a go-to choice for birdwatchers and outdoor enthusiasts. Ideal for daytime use, it ensures versatility without sacrificing too much on optical quality.
- 10×25 – Enhanced Magnification On the GoApplications: Increased magnification for detailed observations on the go.Characteristics: Compact, suitable for daytime use, good detail in well-lit conditions.Considerations: Limited low light performance.For greater magnification in a compact package, the 10×25 configuration steps up the game. Perfect for daytime adventurers, it provides enhanced detail while maintaining portability, though low light performance is limited.
- 10×26 – Detailed Daytime Observations, Compact DesignApplications: Compact option for detailed daytime observations.Characteristics: Enhanced magnification, still portable.Considerations: Limited low light performance.Similar to the 10×25, the 10×26 configuration excels in detailed daytime observations with increased magnification. However, users should be mindful of its limitations in low light conditions.
Mid-Size Models (8×32, 9×32, 10×32)
- 8×32 – Versatility with Balanced MagnificationApplications: Versatile, suitable for birdwatching and various outdoor activities.Characteristics: Balanced magnification, good compromise between portability and performance.Considerations: Slightly heavier, narrower field of view compared to compact models.Stepping into the mid-size category, the 8×32 configuration offers versatility for birdwatching and outdoor activities. While balanced in magnification, users should be prepared for a slightly heavier instrument.
- 10×32 – Detailed Observations Without Sacrificing PortabilityApplications: Increased magnification for detailed observations on the go.Characteristics: Enhanced detail, still relatively portable.Considerations: Narrower field of view, potential stability challenges.For those desiring more detailed observations without sacrificing portability, the 10×32 configuration strikes a balance but may pose stability challenges without additional support.
- 8×30 – Versatile Lightweight DesignApplications: Versatile, suitable for general outdoor use.Characteristics: Balanced magnification, lightweight design.Considerations: Slightly larger than compact models.The 8×30 configuration combines versatility with a lightweight design, suitable for general outdoor use. While slightly larger than compact models, it maintains a balance in magnification and portability.
Full-Size Models (8×42, 10×42, 8.5×45)
- 8×42 – Balanced Magnification for Various ActivitiesApplications: Versatile, suitable for various outdoor activities.Characteristics: Balanced magnification, brighter image, and good stability.Considerations: Bulkier than smaller models.Entering the realm of full-size models, the 8×42 configuration is a versatile choice for various outdoor activities. Balanced magnification and good stability come at the cost of increased size and weight.
- 10×42 – Popular Choice for Varied ObservationsApplications: Popular choice for birdwatching, wildlife observation, and stargazing.Characteristics: Excellent detail, suitable for a range of activities.Considerations: Slightly heavier, may require additional support for extended use.The 10×42 configuration excels in birdwatching, wildlife observation, and stargazing with excellent detail. However, users should be mindful of its slightly heavier build, which may require additional support during extended use.
- 8.5×45 – Enhanced Performance in a Balanced Package
Applications: Versatile, with enhanced magnification and larger objective lenses.
Characteristics: Balanced performance for various outdoor activities.
Considerations: Slightly larger and heavier than standard full-size models.
The 8.5×45 configuration offers enhanced magnification and larger objective lenses for balanced performance in various outdoor activities. It sits between standard full-size and larger models in terms of size and weight.
Larger Models (7×50, 10×50, 12×50, 15×56)
- 7×50 – Optimal for Low Light Conditions and Astronomy
Applications: Suitable for low light conditions, marine use, and astronomy.
Characteristics: Larger objective lenses for improved low light performance.
Considerations: Bulkier and heavier than mid-size and compact models.
Moving into larger models, the 7×50 configuration is ideal for low light conditions, marine use, and astronomy. Larger objective lenses enhance low light performance, but users should be prepared for increased bulk and weight.
- 10×50 – High Magnification for Astronomy and Wildlife Observation
Applications: Ideal for astronomy, low light wildlife observation.
Characteristics: High magnification and large objective lenses for detailed observations.
Considerations: Heavier, may require additional support.
The 10×50 configuration, with its high magnification and large objective lenses, is ideal for astronomy and low light wildlife observation. However, its heavier build may benefit from additional support.
- 12×50 – Detailed Observations in Low Light Conditions
Applications: Detailed observations in low light conditions.
Characteristics: High magnification with a larger objective lens for increased detail.
Considerations: Bulkier and heavier, suitable for tripod use.
For those seeking detailed observations in low light conditions, the 12×50 configuration offers high magnification and a larger objective lens. Its bulkier design may require tripod use for stability.
- 15×56 – Specialized Use for Maximum Detail
Applications: Specialized use for long-distance observation and astronomy.
Characteristics: High magnification, large objective lenses for maximum detail.
Considerations: Heaviest and largest, typically tripod-mounted for stability.
The 15×56 configuration is designed for specialized use, offering high magnification and large objective lenses for maximum detail. However, it is the heaviest and largest among the options, typically requiring tripod mounting for stability.
4. Practical Implications: Understanding magnification practically means appreciating its impact on your viewing experience. Higher magnifications provide more detailed images but can be challenging to stabilize without additional support. On the other hand, lower magnifications offer a wider field of view and are often preferred for activities where a stable image is crucial.
5. Choosing the Right Magnification: Consider your specific needs when selecting binoculars. A higher magnification might be suitable if you anticipate observing subjects from a distance or want to bring details closer. However, for activities like birdwatching, where a broader view is often necessary, a moderate magnification like 8x might be the perfect fit.
Understanding magnification transforms your binoculars from mere optical instruments to personalized windows into the world around you. The balance between detail and stability that magnification offers is the key to unlocking the full potential of your binoculars.
Decoding Objective Lens Diameter
As we navigate the intricate world of binocular numbers, our next stop is the objective lens diameter—a crucial aspect that plays a defining role in the performance of your binoculars.
1. Explanation of Objective Lens Diameter: Objective lens diameter is denoted by the second number in the binocular specification, such as 8x42. It represents the diameter of the front lenses in millimeters. In simple terms, a larger objective lens diameter means more light-gathering capability.
2. Relationship Between Objective Lens Diameter and Light Gathering: The correlation between objective lens diameter and light gathering is elemental. Larger lenses capture more light, making binoculars with bigger objective lenses ideal for low-light conditions. This feature is especially advantageous during dawn, dusk, or in environments with reduced natural light.
3. Impact of Objective Lens Diameter on Field of View: While the primary function of the objective lens is light gathering, it also influences the field of view. Larger objective lenses tend to provide a wider field of view, enabling you to capture more of your surroundings at a glance.
4. Practical Considerations: Let’s break down the practical considerations of objective lens diameter through Table 2.
Table 2: Objective Lens Diameter and Light Gathering
| Objective Lens Diameter (mm) | Light Gathering Capability |
|---|---|
| 32 | Standard |
| 42 | Enhanced |
| 50+ | Excellent |
5. Choosing the Right Objective Lens Diameter: When selecting binoculars, the optimal objective lens diameter depends on your intended use. For general-purpose observations, a standard 32mm might suffice. If you’re an avid nature enthusiast or astronomer, consider stepping up to 42mm or larger for enhanced performance.
6. Balancing Size and Performance: It’s important to note that while a larger objective lens diameter contributes to improved performance, it also increases the overall size and weight of the binoculars. Consider a balance between enhanced performance and portability based on your preferences and activities.
Grasping the Exit Pupil
Now, let’s turn our attention to the often-overlooked but crucial element in the binocular equation—the exit pupil. Like a beam of light emerging from the eyepiece, the exit pupil sheds light on low-light performance and comfort during extended use.
1. Definition and Importance of Exit Pupil: The exit pupil is a tiny circle of light that appears in the eyepiece when you hold binoculars at arm’s length. It’s calculated by dividing the objective lens diameter by the magnification (e.g., 42/8 for 8×42). This seemingly simple number has profound implications for your viewing experience.
2. Calculating Exit Pupil Size: To calculate the exit pupil size, you can use the formula:
Exit Pupil=Objective Lens DiameterMagnificationExit Pupil=MagnificationObjective Lens Diameter
This calculation results in a number measured in millimeters, representing the diameter of the exit pupil. A larger exit pupil generally translates to a brighter image, particularly beneficial in low-light conditions.
3. How Exit Pupil Affects Low-Light Performance: The exit pupil directly influences a binocular’s performance in low-light situations. In scenarios such as dawn, dusk, or stargazing, where natural light is scarce, a larger exit pupil, typically above 5mm, ensures that your eyes receive more light, leading to brighter and clearer images.
4. Practical Considerations: Let’s bring the concept of exit pupil into practical considerations through Table 3.
Table 3: Exit Pupil and Low-Light Performance
| Exit Pupil (mm) | Low-Light Performance |
|---|---|
| < 5 | Limited brightness |
| 5-7 | Adequate brightness |
| > 7 | Excellent brightness |
5. Choosing the Right Exit Pupil: Consider your preferred activities and the lighting conditions in which you’ll use your binoculars. For stargazers or those who enjoy early morning birdwatching, a larger exit pupil is advisable for an optimal viewing experience.
Understanding and grasping the exit pupil opens the door to a world where the nuances of low-light situations are unveiled. As we continue our journey through the intricacies of binocular numbers, each element contributes to the tapestry of a viewing experience that is not just clear but also tailored to your preferences and needs.
Field of View Unveiled
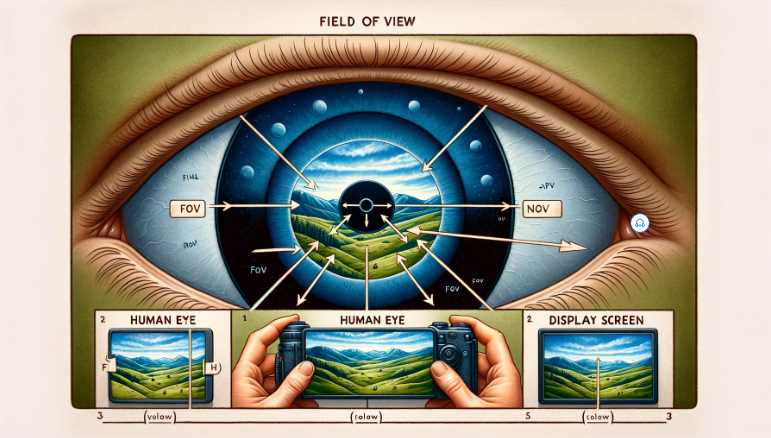
As we progress in our exploration of binocular numbers, our focus now shifts to the often underestimated yet vital aspect—field of view. This parameter determines how much of the scene you can capture at a glance, influencing the immersive quality of your observations.
1. Definition of Field of View: Field of view (FOV) is a measure of the width of the observable area seen through the binoculars. It’s often expressed in degrees or feet at a specific distance. A wider field of view allows you to take in more of your surroundings without having to move the binoculars.
2. Different Types of Field of View: There are generally three types of field of view—wide, standard, and narrow.
- Wide FOV: Ideal for activities like birdwatching and sports events where a broad view is essential.
- Standard FOV: A balanced choice for general-purpose observations, offering a blend of detail and width.
- Narrow FOV: Suited for specific scenarios like astronomy or long-distance viewing, providing a more focused and detailed view.
3. Practical Implications of Field of View: The practical implications of field of view are crucial for choosing binoculars that align with your intended activities. A wider field of view is advantageous for tracking fast-moving subjects, while a narrower field is beneficial for detailed observations.
4. Choosing the Right Field of View: Tailor your choice based on the nature of your observations:
- Wide FOV: Birdwatching, sports events
- Standard FOV: General-purpose
- Narrow FOV: Astronomy, long-distance viewing
5. Summary of Field of View Types: Summarizing the types of field of view through Table
| Field of View | Best Use |
|---|---|
| Wide | Birdwatching, sports |
| Standard | General-purpose |
| Narrow | Astronomy, long-distance |
Understanding field of view is akin to widening the canvas of your visual exploration. The choice between wide, standard, or narrow field of view is a personal one, influenced by the specific activities you cherish.
Factors Influencing Binocular Performance
Coating and Prisms: Enhancing Clarity and Performance
In the intricate realm of binoculars, the coatings on lenses and the prisms nestled within play a crucial role in shaping the quality of your viewing experience. Let’s delve into the significance of these elements and how they contribute to the optical prowess of your binoculars.
Lens Coatings: Unveiling the Layers of Brilliance
When you gaze through a pair of binoculars, the clarity and vividness of the image are significantly influenced by lens coatings. Manufacturers apply coatings to reduce reflections, increase light transmission, and enhance contrast. Here are some common types of lens coatings you might encounter:
- Fully Coated: A single layer of coating on all air-to-glass surfaces. While an improvement over uncoated lenses, fully coated binoculars may still experience glare and reduced clarity in challenging lighting conditions.
- Multi-Coated: Featuring multiple layers on at least one lens surface, multi-coated binoculars provide enhanced light transmission and improved image quality. These are a popular choice for users seeking a balance between performance and cost.
- Fully Multi-Coated: The pinnacle of lens coatings, fully multi-coated binoculars boast multiple layers on all air-to-glass surfaces. This meticulous treatment minimizes glare, maximizes light transmission, and ensures a crisp, bright view in various lighting scenarios.
Common Lens Coatings
| Coating Type | Description |
|---|---|
| Fully Coated | Single layer on all air-to-glass surfaces |
| Multi-Coated | Multiple layers on at least one lens surface |
| Fully Multi-Coated | Multiple layers on all air-to-glass surfaces |
Prisms: Directing Light for Optimal Viewing
Prisms inside binoculars serve a crucial role in erecting the image and folding the optical path, ensuring a more compact design. Two primary types of prisms, roof and Porro prisms, are commonly used, each with its advantages:
- Roof Prisms: Known for their streamlined design, roof prisms result in a more compact and straight-barreled binocular. They often appeal to users looking for a slim and easily portable option.
- Porro Prisms: Characterized by their offset barrel design, Porro prisms provide a wider separation between the objective lenses, contributing to a more immersive three-dimensional view. Binoculars with Porro prisms are often favored for their depth perception and wide field of view.
Understanding Eye Relief: The Gateway to Comfortable Viewing
In the intricate landscape of binocular specifications, eye relief stands out as a critical factor for ensuring a comfortable and enjoyable viewing experience. Let’s unravel the mysteries of eye relief, exploring its definition, importance, and optimal considerations.
Defining Eye Relief
Eye relief refers to the distance between the eyepiece lens and your eyes while still maintaining a full field of view. This distance is crucial for individuals who wear glasses, ensuring that they can see the entire image without vignetting or loss of clarity.
Importance of Optimal Eye Relief
Optimal eye relief is essential for several reasons:
- Comfort: Long viewing sessions can strain the eyes. Adequate eye relief allows for a comfortable viewing experience without the need to press your eyes against the eyepiece.
- Eyeglass Wearers: For those who wear glasses, eye relief is especially critical. It allows individuals to enjoy the full field of view without removing their glasses, accommodating different visual needs.
- Safety: Maintaining a proper distance between the eyepiece and your eyes is not only about comfort but also safety. Adequate eye relief prevents the risk of injury, especially during rapid or unexpected movements.
Optimal Eye Relief Range
While specific preferences may vary, a general guideline for optimal eye relief falls within the range of 12-15mm. This range ensures that users, with or without glasses, can comfortably view the entire field without compromising on image quality.
Eye Relief Recommendations
| User Type | Optimal Eye Relief Range |
|---|---|
| Non-Eyeglass Wearer | 12-15mm |
| Eyeglass Wearer | 15mm or more |
Tips for Eyeglass Wearers
For those who wear glasses, consider the following tips to maximize your viewing experience:
- Adjustable Eyecups: Opt for binoculars with adjustable eyecups. Twist-up eyecups provide flexibility in achieving the right eye relief, ensuring a comfortable fit with or without glasses.
- Long Eye Relief Models: Explore binocular models specifically designed for eyeglass wearers. These often feature longer eye relief to accommodate the additional distance created by glasses.
What is Meant By Magnification Numbers?
When you buy a Binocular, you first see some numbers like 10×50 or 12×60. Seeing these numbers, you feel like these are significant numbers, but the problem is you don’t know the significance of these numbers.
Here, the primary number, such as 10x & 12x, defines the strength of magnification. More magnification power helps you to see the object more closely. Here, 10x means you will see the object ten times closer than its actual distance, and 12x means you will see the object 12 times closer than its actual distance. The eyepiece magnifies the distance between the binoculars and the objects.
But with more magnifying power comes difficulty in controlling the steadiness. So, it would be best if you used some support to get much stability for the Binoculars with ultra magnifying power. You can adjust the magnifying power manually with zoom binoculars.
What is Meant by the Numbers After the Magnification Number?
The number after the magnification number refers to the size of the objective lens. It is also called an aperture. A common word, proper? It is a common word for the camera section. Yes, cameras and Binoculars both work with lenses. You can know the lens size of your pair of binoculars by these numbers.
For example, In a Binocular with 12×60 numbers, there will be 60mm objective lenses. So, this number defines your binocular lens size. With bigger lenses, your binoculars will look more prominent. If you want to see a brighter image, you will need bigger lenses.
You know that objective lens diameter collects the lights. So, the bigger aperture will give you better image quality. Again, if you want to see the night sky, a more significant objective diameter will help you better image quality because the aperture’s job is light gathering.
So, the numbers after the magnification numbers define the sizes of the objective lenses. The numbers can vary, and the size of the lenses as well. You have to choose your Binocular according to your needs.
Confusion Regarding Magnification Number and Aperture
Still, the numbers can confuse you. Like, you may think that what numbers between 12×40 and 12×60 will be better for seeing the beautiful sky at night? As we discussed earlier, 12x defines how close the object will be, and 40 60 defines how clearer, brighter, and broader the image will be. So, it’s clear that 12×60 will give you more superior viewing experience and be better for night sky watching and daylight viewing.
AoV & FoV: What does it mean by Angle of view and Field of view?
We will explain the angle of view first, then the field of view, and after completing the explanation, we will clear your confusion between them.
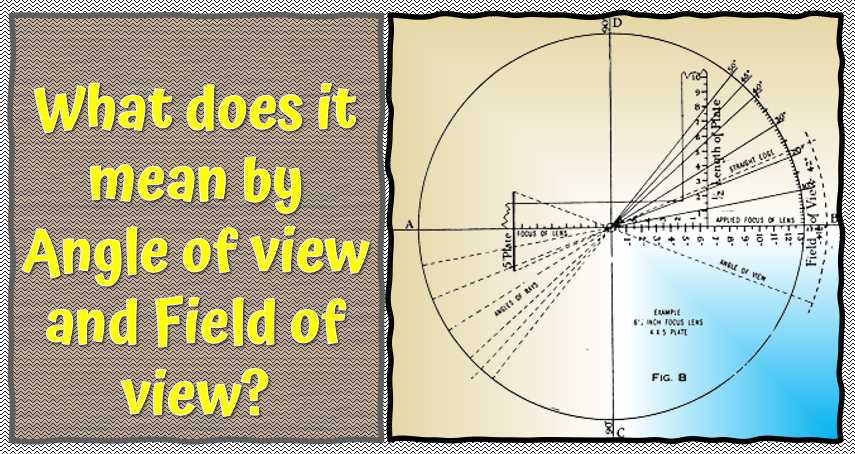
The angle of view is described in degrees. It refers to the amount of horizontal view you can see with your binoculars. More degrees will allow you to see a broader picture. If you want the right viewing angle, the degrees should be more than 6. Sometimes, you may see some higher numbers. No tension. Here the company used the actual amount of AoV. For example, you may see 90 degrees, but the manufacturer multiplied the Aov with the Magnification number of Binoculars.
For Instance: a 12×60 binocular with 7.5 degrees Aov will get 90 Degrees’ actual AoV by multiplying (7.5 x 12 = 90).
The main difference between Aov and FoV is, Aov is written in degrees, whereas Fov is in feet or meters. But both of them refer to the same thing, the size of the image you will see from your binoculars. So, the higher field of view means you will get a bigger picture. But don’t forget that more powerful magnification will decrease the viewing field because more magnification gives you a closer view. You will get a limited view if you want to watch it closely. More than 300 feet is enough FoV for Binoculars.
Confusion:
We have seen that the purposes of the angle of view and field of view are quite similar. Though they are not the same, you can convert Aov into FoV. To convert Aov into Fov, you must multiply the Aov by 52.5.
For example: suppose your Aov is 7.5 degrees; you want to convert it into FoV, then multiply it by 52.5.
52.5 x 7.5= 393.75. So, here the field of view is 393.75.
What is the Exit Pupil Diameter?
EPN (Exit pupil – number) defines the amount of light that sees the object. It is essential because you need perfect light to see any particular image. You must divide the objective lens sizes with magnification numbers to know the exit pupil size.
For instance: You have a 12×60 Binocular. The exit pupil number is 5 (60/12 = 5). Or, to compare the sizes between two binoculars, you can see the difference by merely holding them together. But I think the calculation is the more comfortable and perfect process to know the numbers of exit pupil size.
Try to get a Binocular with a more considerable amount of exit pupil numbers. But most of the time, more than 4mm is okay. More exit pupil diameter is better for low light conditions because it gives you more light to see the objects.
What is the Closest Focus distance Number?
Above, we discussed how far you can see, how much brighter the afar image can be, and how wider you can see. But you need to know another important thing to get a luminous image quality: the minimum focus distance. The minimum focus distance to focus is around 4 meters.
What is Eye Relief?
This ERN (eye relief – number) is essential for people who wear glasses. It informs your eye’s distance from the eyecups and helps you to adjust it. 15mm eye relief is enough. So before buying, confirm that it has enough eye relief if you wear glasses because the image quality also depends on eye relief distance (number).
Type of prism: What are the kinds of prism used in Binoculars?
Manufacturers use a different type of prism design as optical elements in a pair of binoculars. Porro prism mirrors and Roof prism mirrors are two prism types.
Common Myths and Misconceptions: Dispelling Binocular Fallacies
Embarking on the journey to choose the perfect binoculars, one often encounters a myriad of myths and misconceptions that can cloud the decision-making process. Let’s debunk some of these common fallacies to ensure you navigate the world of binoculars with clarity.
Myth: Higher Magnification is Always Better
Contrary to popular belief, higher magnification is not a universal panacea for all viewing needs. While it may seem tempting to go for the maximum magnification available, it comes with trade-offs. High magnification exacerbates image shake, making it challenging to maintain a steady view without the aid of additional stabilization tools. Moreover, it narrows the field of view, potentially making it harder to locate and track moving subjects.
Myth: Bigger Objective Lenses Guarantee Better Image Quality
While larger objective lenses contribute to enhanced light-gathering capability, assuming that bigger is always better can lead to misconceptions. A balance between objective lens size, magnification, and the quality of lens coatings is crucial. A well-coated smaller lens may outperform a larger, uncoated lens in terms of image brightness and clarity.
Myth: All Coatings Are the Same
Not all coatings are created equal. The type and quality of coatings on binocular lenses significantly impact image quality. Binoculars labeled as “coated” may have a single layer, while “fully multi-coated” models boast multiple layers on all air-to-glass surfaces. Understanding these distinctions ensures you make an informed decision when choosing binoculars.
Table 7: Dispelling Binocular Myths
| Myth | Reality |
|---|---|
| Higher magnification is always better | Trade-offs in stability and field of view |
| Bigger objective lenses mean better quality | Balance with magnification and lens coatings |
| All coatings are the same | Differences in types and quality of coatings |
By dispelling these common myths, you can approach the selection of binoculars with a clear perspective. Understanding the nuances of magnification, lens size, and coatings will empower you to make a choice that aligns with your specific needs and ensures a rewarding visual experience.
Final Words
Now, you are familiar with a binocular’s numbers and terminology. Remember these tips in short: you will get less FoV with more significant magnification, big objective lenses are helpful for the low light condition, and ensure a higher than 4mm exit pupil number for enough light to see.
If you are a beginner and not an expert binocular holder, you are requested to avoid more than a 12x magnification number because a powerful binocular can hamper your viewing experience. We hope you have a clear idea about Binocular numbers and terminology. Now you can buy a binocular like an expert.

I am an enthusiastic student of optics, so I may be biased when I say that optics is one of the most critical fields. It doesn’t matter what type of optics you are talking about – optics for astronomy, medicine, engineering, or pleasure – all types are essential.
Table of Contents
Pingback: A Complete Guide to Cleaning Binoculars: How to Keep Them Looking Like New!
Pingback: Which binocular magnification is better?
Pingback: How do binocular numbers work?