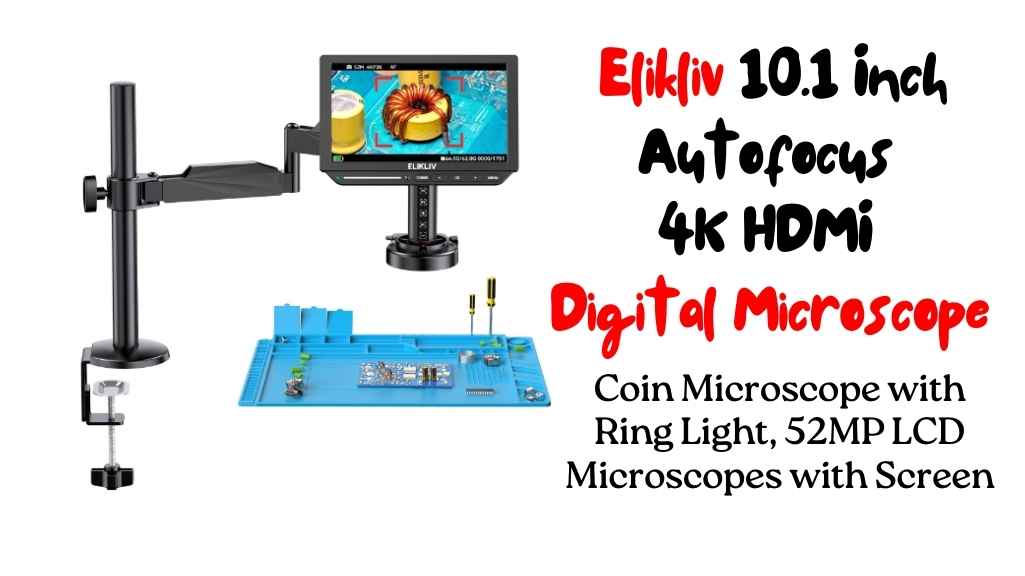
Blog

  • Step-by-Step Guide on How to Care for Camera Lenses (Video Explained)

    Step-by-Step Guide on How to Care for Camera Lenses (Video Explained)

    If you want to know how to clean a camera lens, then you are in the right place. Who doesn’t like photography?  Almost every person loves to capture their beautiful moments. But professional photographers need good DSLR cameras and clean lenses to capture those stunning images. So, cleaning the DSLR lens is crucial for any photographer who wants to capture a perfect photo.

    But we must know the proper way of cleaning the DSLR lens. Maintaining the DSLR is important but cleaning the lens is more critical. If there is any dust or particles on the camera’s lens, it’ll ruin the whole image quality.  

    ImageProductDetailPrice
    13 in 1 Fiber Optic Cleaning Tool kit

    13 in 1 Fiber Optic Cleaning Tool kit

    • Optical Fiber Microscope
    • Fiber optic cleaning cotton swab
    See on Amazon
    YICIZOL Optic Fiber Cleaning Inspection Kits

    YICIZOL Optic Fiber Cleaning Inspection Kits

    • 400 Times Fiber Connector
    • Small size, one-handed, convenient and fast
    See on Amazon
    Camera Lens Cleaning Kit, 10-in-1 Camera Cleaning Kit

    Camera Lens Cleaning Kit, 10-in-1 Camera Cleaning Kit

    • Safety, Simple, Effective, Static-free, Multi-propuse, unique cleaning kit for your life!
    See on Amazon
    Professional DSLR Camera Cleaning Kit 

    Professional DSLR Camera Cleaning Kit 

    • High-Power Biological Microscope for Students
    See on Amazon
    AmScope MLA-Kim Microscope Maintenance Kit

    AmScope MLA-Kim Microscope Maintenance Kit

    • 1/4 Oz Type B medium viscosity immersion oil for better microscopy images and prolonged use
    See on Amazon

    Which brand’s DSLR lens cleaner will be best?

    There are so many brands that sell the DSLR lens cleaning kit. Choosing the best cleaning kit for your precious DSLR camera is confusing. But don’t worry at all; we listed some best lens cleaners that are excellent and affordable.

    So, these are some cleaning kits of popular brands that are highly rated and affordable. 

    Understanding Camera Lenses

    Camera lenses are marvels of optical engineering, comprising multiple elements that work in harmony to capture the perfect shot. To truly appreciate the significance of lens cleaning, let’s delve into the key components that make up these optical wonders.

    Lens Elements and Functions:

    Element TypeFunction
    Convex LensFocuses light onto the camera sensor.
    Concave LensAdjusts the focal length for zooming.
    ApertureControls the amount of light entering the lens.
    Lens CoatingReduces glare, reflections, and enhances image contrast.

    Understanding the functions of these elements is vital for realizing the impact that contaminants can have on your lens. Dust, fingerprints, and smudges not only compromise the clarity of your images but can also interfere with the delicate balance of these elements.

    Vulnerability to Contaminants:

    Camera lenses are exposed to various environmental factors, making them susceptible to contaminants such as:

    1. Dust and Sand: Fine particles can settle on the lens surface, affecting image quality.
    2. Fingerprints: Oils from fingertips can leave smudges, degrading the clarity of the lens.
    3. Moisture: Humidity and moisture can lead to fungal growth on lens elements.

    This vulnerability emphasizes the importance of regular lens maintenance to ensure optimal performance.

    Impact on Image Quality:

    The table below illustrates the potential impact of contaminants on image quality:

    ContaminantImpact on Image Quality
    DustCauses hazy spots and reduces overall sharpness.
    FingerprintsResults in blurred or distorted areas in the image.
    Moisture/FungusLeads to spots, discoloration, and a loss of contrast.

    Appreciating the intricate nature of camera lenses and the potential consequences of neglecting their care underscores the necessity of regular cleaning into your photographic routine.

    Signs of a Dirty Lens

    Capturing the perfect shot requires more than just a keen eye; it demands a lens that’s as clear as your vision. Recognizing the signs of a dirty lens is crucial for maintaining the integrity of your photographs. Let’s explore the visible indicators that signal it’s time to give your lens some TLC.

    Visible Signs of a Dirty Lens:

    SignsDescription
    Blurred ImagesUnexplained blurriness, especially in specific areas, indicates a dirty or smudged lens surface.
    Loss of ContrastA reduction in the sharpness of colors and contrast may result from contaminants affecting the lens coating.
    Visible Spots or StreaksDust particles or fingerprints can manifest as visible spots or streaks on your images.
    Autofocus IssuesDifficulty in achieving precise autofocus can be a symptom of a dirty lens interfering with the camera’s sensors.

    Impact on Autofocus and Overall Functionality:

    Recognizing these signs is not merely about aesthetics; it’s about understanding how a dirty lens can impact your camera’s functionality. The table below illustrates the potential consequences:

    IssueImpact on Camera Functionality
    Autofocus ProblemsSluggish or inaccurate autofocus performance, leading to missed shots.
    Exposure InconsistencyContaminants can affect light transmission, resulting in inconsistent exposure levels.
    Reduced Image QualityOverall degradation of image quality, affecting the clarity and sharpness of photos.

    By staying vigilant to these signs, you can address lens cleanliness promptly, ensuring your camera performs at its best. In the next section, we’ll explore the essential tools needed for effective lens cleaning, allowing you to restore crystal clarity to your photographic endeavors.

    Tools and Materials for Lens Cleaning

    Maintaining the cleanliness of your camera lens requires the right tools and materials. Over the years, as a photographer, I’ve experimented with various cleaning supplies, and I’ve discovered the essentials that every photographer should have in their cleaning kit. Let’s dive into the world of lens cleaning tools and materials.

    Essential Lens Cleaning Tools:

    ToolDescription
    Microfiber ClothSoft, lint-free cloth for gentle wiping without scratching the lens surface.
    Lens Cleaning SolutionSpecifically formulated solution to remove smudges, fingerprints, and other contaminants.
    Lens BrushA delicate brush for removing loose particles before using the cleaning solution.
    Air BlowerA tool for blowing away dust and debris from the lens surface.
    Lens TissuesThin, disposable tissues designed for lens cleaning purposes.

    Lens Cleaning Kits:

    Cleaning Kit ComponentsPurpose
    Lens PenCombines a brush and a cleaning tip in a compact, pen-like design for quick cleaning on the go.
    Lens Cleaning WipesPre-moistened wipes for convenient and efficient cleaning, especially useful in the field.
    Lens Cleaning PenA dual-sided tool with a brush and a cleaning pad for thorough and precise cleaning.

    Tips for Selecting Cleaning Tools:

    1. Compatibility: Ensure the tools are suitable for your lens type (e.g., coated or uncoated).
    2. Gentleness: Opt for tools that are gentle to prevent scratches or damage to lens coatings.
    3. Quality: Invest in high-quality tools to ensure effectiveness and longevity.

    DIY Lens Cleaning Solution:

    IngredientPurpose
    Isopropyl Alcohol (90%)Disinfects and removes stubborn contaminants.
    Distilled WaterDilutes the alcohol for a safe cleaning solution.

    Mixing your cleaning solution ensures control over the ingredients, especially important for sensitive lens coatings.

    Preparing for Lens Cleaning

    Embarking on the journey of lens cleaning requires more than just having the right tools; it involves careful preparation to ensure a successful and safe cleaning process. Drawing from my experiences, here’s a step-by-step guide to preparing for lens cleaning:

    1. Select a Clean Workspace:
      • Choose a well-lit and dust-free environment to minimize the risk of additional contaminants landing on your lens during the cleaning process.
    2. Turn Off Your Camera:
      • Power off your camera to prevent any accidental mishaps during the cleaning. This ensures the safety of both your camera and the lens.
    3. Remove Loose Particles:
      • Before applying any cleaning solution, use a soft lens brush or air blower to remove loose dust and debris from the lens surface. This helps prevent scratching during the wiping process.
    4. Inspect for Stubborn Stains:
      • Identify any persistent stains or smudges on the lens. Stubborn contaminants may require extra attention during the cleaning process.
    5. Check Lens Coating:
      • If your lens has specialized coatings, such as anti-glare or multi-coatings, take note of them. Some cleaning solutions may be better suited for coated lenses.
    6. Organize Your Cleaning Tools:
      • Lay out your cleaning tools and materials within easy reach. Having everything organized ensures a smooth and efficient cleaning process.
    7. Review Camera Manual:
      • Consult your camera manual for any specific guidelines or recommendations for cleaning your particular lens model. Manufacturers often provide valuable insights.

    10 Step-by-Step Lens Cleaning Guide

    Embarking on the journey of cleaning your camera lens may seem daunting, but fear not. In this step-by-step guide, I’ll walk you through the process, providing insights from my own experiences as a photographer. Follow these steps for a thorough and effective lens cleaning.

    Step 1: Gather Your Tools

    Before you begin, ensure you have all the necessary tools within reach. Refer to the table below for a quick checklist:

    ToolPurpose
    Microfiber ClothGentle wiping without scratching the lens.
    Lens Cleaning SolutionRemoves smudges, fingerprints, and contaminants.
    Lens BrushRemoves loose particles before cleaning.
    Air BlowerBlows away dust and debris from the lens.
    Lens TissuesDisposable tissues for precise cleaning.

    Step 2: Power Off Your Camera

    Before diving into the cleaning process, turn off your camera. This ensures safety for both your equipment and the lens during the cleaning.

    Step 3: Remove Loose Particles

    Use a lens brush or air blower to gently remove any loose dust or debris from the lens surface. This initial step prevents scratching during the cleaning process.

    Step 4: Apply Lens Cleaning Solution

    Dampen a corner of your microfiber cloth with the lens cleaning solution. Be cautious not to oversaturate the cloth. Refer to the table for a quick overview of the cleaning solution components:

    IngredientPurpose
    Isopropyl Alcohol (90%)Disinfects and removes stubborn contaminants.
    Distilled WaterDilutes the alcohol for a safe cleaning solution.

    Step 5: Wipe the Lens Surface

    Gently wipe the lens surface using the dampened corner of the microfiber cloth. Use circular motions, starting from the center and moving outward. This helps to evenly distribute the cleaning solution and remove contaminants.

    Step 6: Address Stubborn Stains

    For stubborn stains or smudges, you may need to apply a bit more pressure. Be cautious not to exert excessive force, especially if dealing with sensitive lens coatings.

    Step 7: Dry the Lens

    Switch to the dry part of the microfiber cloth to ensure a streak-free finish. Again, use gentle circular motions, maintaining a consistent pressure.

    Step 8: Inspect for Residue

    Inspect the lens for any residue or streaks. If necessary, repeat the cleaning process with a fresh microfiber cloth until the lens is spotless.

    Step 9: Check Lens Coating

    If your lens has specialized coatings, ensure that the cleaning solution used is compatible. Some coatings may require specific cleaning solutions or extra care to avoid damage.

    Step 10: Final Inspection

    Power on your camera and visually inspect the lens through the viewfinder. Check for any anomalies in image quality or autofocus performance. If everything looks clear, you’ve successfully cleaned your lens.

    By following these steps with care and attention to detail, you’ll maintain the integrity of your camera lens and ensure that each shot captures the clarity and brilliance it deserves. In the next section, we’ll explore specific tips for cleaning different types of lenses, from primes to zooms and specialized lenses.

    Cleaning Specific Lens Types

    Not all lenses are created equal, and the approach to cleaning them may vary based on their types and features. As a photographer, I’ve navigated through cleaning different lenses, and here are specific tips for maintaining the clarity of various lens types:

    Cleaning Prime Lenses:

    Prime lenses, known for their fixed focal lengths, are relatively straightforward to clean. Follow the general lens cleaning guide, paying special attention to the glass elements. The lack of a zoom mechanism simplifies the process, allowing for precise cleaning without the need for extra adjustments.

    Cleaning Zoom Lenses:

    Zoom lenses, with their adjustable focal lengths, require a bit more attention. During the cleaning process, extend and retract the lens to access all parts of the glass. Be cautious around the zoom ring, ensuring that no cleaning solution or debris is lodged in the crevices. Cleaning a zoom lens may take a bit more time, but the effort ensures uniform image quality across different focal lengths.

    Special Considerations for Specialized Lenses:

    Specialized lenses, such as macro, fisheye, or tilt-shift lenses, may have unique characteristics that demand careful cleaning. For macro lenses with intricate focusing mechanisms, exercise extra caution to avoid disrupting delicate components. Fisheye lenses with curved glass may require additional attention to ensure every part of the lens is thoroughly cleaned. Tilt-shift lenses, known for their complex optics, benefit from meticulous cleaning to preserve their precision.

    Always refer to the manufacturer’s guidelines for specific lens types, especially if they have proprietary coatings or features that require particular care. By understanding the nuances of cleaning different lens types, you’ll ensure that each lens in your collection continues to deliver exceptional image quality. In the next section, we’ll explore the dos and don’ts of lens cleaning, offering insights to avoid common pitfalls and maintain the longevity of your lenses.

    Lens Cleaning Dos and Don’ts

    Effectively cleaning camera lenses requires a delicate touch and adherence to best practices. Below, I’ve outlined the crucial dos and don’ts to ensure the longevity and optimal performance of your lenses.

    Dos:

    ActionReason
    Use Gentle MovementsGentle circular motions prevent scratches and ensure even cleaning.
    Check CompatibilityEnsure cleaning solutions and tools are compatible with your lens coatings.
    Follow Manufacturer GuidelinesAdhere to any specific cleaning recommendations provided by the lens manufacturer.
    Inspect RegularlyRoutinely inspect your lenses for signs of dust, smudges, or other contaminants.

    Don’ts:

    ActionReason
    Use Excessive ForceApplying too much pressure can damage lens coatings or elements.
    Neglect Environmental FactorsAvoid cleaning in dusty or windy environments to prevent additional contaminants.
    Use Inappropriate Cleaning MaterialsUsing rough cloths or household cleaners can scratch and damage the lens.
    Over-CleanExcessive cleaning can wear down lens coatings, impacting image quality over time.

    Routine Lens Maintenance

    Ensuring the longevity and peak performance of your camera lenses goes beyond sporadic cleaning—it involves incorporating routine maintenance into your photography habits. As a photographer, I’ve learned that a proactive approach can prevent issues before they compromise your shots. Consider the following tips for routine lens maintenance:

    1. Regular Inspections: Periodically check your lenses for any signs of dust, smudges, or damage.
    2. Scheduled Cleaning: Establish a cleaning schedule based on your usage frequency to prevent the accumulation of contaminants.
    3. Dust-Free Storage: Store your lenses in a clean and dry environment, preferably in a dedicated camera bag with proper padding.
    4. Lens Caps: Always use lens caps when not actively shooting to protect the lens from dust and scratches.
    5. Avoid Direct Sunlight: Prolonged exposure to direct sunlight can damage lens coatings, so store your lenses in shaded areas when not in use.

    How to run a dirt-checking test on a DSLR lens?

    Following two simple methods, you can quickly check any dirt or particles on your DSLR camera lens. 

    Method One:

    Set the focused mood to the manual perspective on your DSLR camera. Now slowly turn the focus ring to infinity. Now you can quickly see those tiny dust and dirt in the viewfinder.

    Method Two:

    Take some photos of bare surfaces. Capturing the Black/white background is the best option—capture a light contextual and a dark background. Now sift through these photos. If there is any dust, it’ll show up. 

    How to clean a DSLR lens with a cleaning kit?

    DSLR lens cleaning kits are beneficial. Many profitable brands are selling suitable cleaning kits for DSLR lenses. But we recommend the highest-rated products on Amazon, Walmart, or eBay. Usually, these kits have five accessories inside one set: an air blower, soft-bristled brushes, cleaning wipes, microfiber cloth, and cleaning fluid. Now let’s explore the proper way of cleaning the DSLR camera lens with cleaning tools. 

    CAUTION: You must wear rubber gloves before cleaning the DSLR lens kit.

    Step One:

    Take the air blower to blow the light dust from the DSLR lens. Blow it from a few centimeters away, and it will work nicely. 

    Step Two:

    Take the soft-bristled brush and clean the dust from the DSLR lens. But make sure the soft-bristled brush is made of camel or goat hair to avoid scratches while cleaning the DSLR lens.

    Step Three:

    Rub the cleansing wipes gently on the lens surface and throw them away immediately. Because reusing the cleaning wipes may damage your DSLR lens.

    Step Four:  

    Add a few drops of cleaning fluid on the microfiber cloth and rub it in a circular motion on the lens surface. It will remove oil, smudges, fingerprints, dust, and dirt. 

    Now finally, you’ve finished cleaning your DSLR lens. That is the correct and proper method of cleaning the DSLR lens with cleaning tools.

    How can I keep my camera lens or filter clean?

    Here are some easiest and best methods to keep your DSLR lens clean.

    You must permanently attach the lens cap after finishing capturing photos.

    Do not keep or place your lenses in dusty or dirty areas. Always store them inside your camera bag. 

    While changing lenses, please avoid windy places or weather; the dust can quickly enter your lenses by finding flow.

    When changing the camera lenses, please tilt down your DSLR camera to avoid dust and dirt.

    Always keep a microfiber cloth inside your camera bag. Clean the lens with a microfiber cloth after ending your photography session.

    Please follow these steps daily to help keep your DSLR lenses clean.

    Can I clean my camera lens without lens cleaning solutions?

    Yes, you can also clean your camera lens without the cleaning solution, but it’ll not be as perfect as the previous method.

    Can I clean my camera lens without lens cleaning solutions

    1.  Take a lens tissue or soft cloth and gently wipe it over the camera lens. After cleaning all those light specks of dust, throw away that tissue.

    2.  If there is still dirt or dust, try cleaning them with cotton buds. It will help a lot and will give a better result.

    3.  Now, take lens tissue or cloth, spray a small amount of regular glass cleaner liquid on that tissue, and wipe it over the DSLR lens in a circular motion. It will clean most of the oil and smudges. Do not spray too much liquid, as it can harm your DSLR lens.

    4.  Take a soft dry cloth. Make sure it’s 100% cotton, and wipe the lens again. Now you can see the lens is pretty much cleaned properly. 

    5.  You can use this process to clean your filter.

    You can apply this method if you don’t have cleaning kits, but we always recommend cleaning kits for the perfect cleaning process. 

    WARNING!

    There are some issues you will face while you are cleaning the DSLR lens. Sometimes there are watermarks on the DSLR lens because of applying too much cleaning fluid during the cleaning process. Please try to use a minimum amount of lens cleaning solution while cleaning, and never apply the liquid cleaner directly on the camera lens because it will harm your DSLR lens and leave some watermarks on the lens.

    Do not use a cleaning kit for a very long time. Most people make this mistake. If your cleaning kit becomes old or dirty, please throw it away kindly. Dirty and old cleaning kits ruin your cleaning process and will harm your DSLR Lens. 

    Always check the quality of the soft-bristled brush before cleaning it. Ensure your Soft-bristled brush is made with high-grade materials like camel or goat hair. You can also buy your soft-bristled brushes separately. Sometimes the all-in-one cleaning kit doesn’t come with an excellent soft-bristled brush.

    Try to clean your DSLR lens every day with a microfiber cloth. Always carry a good quality microfiber cloth inside your camera bag. Just wiping the DSLR lens with the microfiber cloths will not take too much time, and keep your DSLR lens always clean.

    Never skip the weekly cleaning session of your DSLR lens. Avoiding or skipping your camera lens cleaning sessions can create a big problem while capturing photos. 

    Do not try to clean your camera lens in too hurry. Always clean the DSLR lens on a weekly holiday. Cleaning your camera lens with endurance will give a much better result.

    Try to avoid making any fingerprints.

    So, these were some warnings you should check out and maintain. You can now quickly clean your DSLR lens with care and achieve good image quality. 

    Tips: If your DSLR camera lens becomes too dirty, please try not to clean it at home. Usually, take your camera lens to a professional DSLR lens cleaner.

    Final words:

    In this article, you learn about camera lenses and the cleaning process. We recommend cleaning a camera lens with the help of professionals. For regular users, try cleaning the lens every night, before and after use. We talk with many professionals; they clean lenses every night and deep clean once a week. They always keep a blower with them. You can also keep a blower for emergencies or better image quality.

    When you are free, clean your lens with a soft hand. Do not break lens glass while cleaning. If you are in a hurry, then usually take a clean towel and wipe it. But avoid cleaning in a rush. 

    We will try to give you all the information and follow all instructions. We hope this article will be helpful to you. 

    Resources and References

    For further guidance on lens cleaning and maintenance, explore the following resources and references:

    1. Lens Cleaning Products:
      • LensPen: A versatile cleaning tool with a brush and a cleaning tip.
      • ZEISS Lens Cleaning Kit: Specifically designed for ZEISS lenses, ensuring effective and safe cleaning.
    2. Online Tutorials:
    3. Manufacturer Guidelines:
    4. Photography Forums:
  • How to Clean Flashlight Lens: 3 Easy Ways to Follow

    Did you know that cleaning your flashlight lens is essential in keeping it functioning optimally? Not only does it help keep your flashlight shining brightly, but it can also help reduce the number of light spills that occur in your home.

    If you own a flashlight, you know that it can be helpful in various situations. From finding your way at night to camping, a flashlight is an essential piece of equipment. But like any other electronic device, a flashlight must be kept clean to work correctly.

    ImageProductDetailPrice
    13 in 1 Fiber Optic Cleaning Tool kit

    13 in 1 Fiber Optic Cleaning Tool kit

    • Optical Fiber Microscope
    • Fiber optic cleaning cotton swab
    See on Amazon
    YICIZOL Optic Fiber Cleaning Inspection Kits

    YICIZOL Optic Fiber Cleaning Inspection Kits

    • 400 Times Fiber Connector
    • Small size, one-handed, convenient and fast
    See on Amazon
    Camera Lens Cleaning Kit, 10-in-1 Camera Cleaning Kit

    Camera Lens Cleaning Kit, 10-in-1 Camera Cleaning Kit

    • Safety, Simple, Effective, Static-free, Multi-propuse, unique cleaning kit for your life!
    See on Amazon
    Professional DSLR Camera Cleaning Kit 

    Professional DSLR Camera Cleaning Kit 

    • High-Power Biological Microscope for Students
    See on Amazon
    AmScope MLA-Kim Microscope Maintenance Kit

    AmScope MLA-Kim Microscope Maintenance Kit

    • 1/4 Oz Type B medium viscosity immersion oil for better microscopy images and prolonged use
    See on Amazon

    In this article, we’ll discuss three easy ways to clean your flashlight lens. So don’t wait – get started cleaning your flashlight today!

    Understanding Flashlight Lens Materials

    Flashlight lenses come in various materials, each with its own characteristics and considerations for cleaning. Common materials include tempered glass, acrylic, and polycarbonate. The type of lens on your flashlight impacts the cleaning methods you should employ. Tempered glass, for example, is more resistant to scratches but may require gentle cleaning to avoid smudges. Acrylic and polycarbonate lenses are lighter and more impact-resistant but can be prone to scratches.

    Tips for Cleaning Specific Lens Types

    Lens TypeCleaning Tips
    Plastic LensesUse caution to avoid scratches; prefer mild cleaning solutions
    Coated LensesUse a mild cleaning solution to preserve the coating
    LED Flashlight LensHandle with care to avoid damage to sensitive components behind it

    What tools do I need to clean my Flashlight Lens?

    When it comes to flashlight lenses, it is essential to use the right tools for the job. Here are four things that you should keep in mind when cleaning your flashlight lens:

    1. Use a microfiber cloth or lint-free towel to clean off dirt and dust.

    2. Wipe the lens’s exterior with a wet paper towel to remove any excess moisture or sweat buildup.

    3. Swab around the perimeter of each light bulb with rubbing alcohol (90% concentration) mixed with water, then dry off completely before replacing bulbs/lens assembly). 

    4. If the lens is heavily stained with chemicals or oil, you may need to disassemble the flashlight and clean all parts using a cloth soaked in mild soap and water.

    How to Clean a Dirty Flashlight Lens?

    Many things can go wrong with a flashlight, and one of the most common is dirty lenses. When your flashlight lens becomes cloudy, it creates darkness inside the beam, making it difficult to see. Not only is this an inconvenience, but it also increases the chances of getting lost or injuring yourself while using your flashlight.

    1. Dispose of the flashlight safely and appropriately: If you can’t or don’t want to take it apart, try to get someone else who can before recycling it. 

    2. Clean the exterior lens with warm water and ammonia: Pour white vinegar into a bowl or glass cup, then add enough cool water to make a whiter solution (about 1/3 cup). Use this mixture to clean all sides of the lens using a soft cloth or sponge. Let dry completely before using again. Avoid getting any liquid inside the light bulb housing as this could damage it- wipe away dirt and bacteria instead! 

    3. Protect your lenses from future contaminants by dusting them off every time you use them: This will help prevent scratches, smudges, fingerprints, etc., that might lead to gradual degradation over time

    4 . Store your flashlight in a clean, dust-free environment: A cool, dry place is best.

    Essential Tools for Cleaning Flashlight Lenses

    ToolPurpose
    Microfiber ClothGentle cleaning and polishing
    Lens Cleaning SolutionRemoving dirt and stains
    Compressed AirRemoving loose particles
    Lens Cleaning Pen/BrushDetailed and targeted cleaning
    Lens Cleaning WipesTackling stubborn stains and residues

    Other Cleaning Methods and Considerations

    Here are a few other flashlight lens cleaning methods that you may want to consider:

    The Alcohol Method -If you’re inclined to drink alcohol, this is the method for you. Pour some vodka or whisky onto a cloth and wet it with water. Then, use the material to clean your flashlight lenses. Be sure not to apply too much pressure, as this might damage your lens finish.

    The Soap Method -This approach involves using soap and water together. Wet your cloth in hot soapy water, and then rub it around the outside of your lenses until they shine clean. Rinse the area thoroughly before putting the towel away next time.

    The Steel Wool Method -Steel wool can be used with liquid hand soap or an alcohol-based cleaner solution (be careful when handling steel wool). This method is similar to The Alcohol Method in that you will get the steel wool, dip it into the cleaner solution, and coat both sides of your lens with it; repeat as necessary until all surfaces have been treated. Remember always to wear safety glasses while using steel wool on optics!

    Step-by-Step Cleaning Process

    Using Compressed Air

    Begin by using compressed air to remove loose particles from the lens surface. Hold the flashlight upside down to prevent particles from falling back onto the lens.

    Applying Lens Cleaning Solution

    Next, apply a small amount of lens cleaning solution or a mild soap solution to a microfiber cloth. Ensure that the solution is suitable for the type of lens material. Avoid using harsh chemicals that can damage the lens coating.

    Using a Lens Cleaning Pen or Brush

    For more detailed cleaning, use a lens cleaning pen or brush. Gently sweep the brush or pen across the lens surface, paying attention to the edges and corners where dirt tends to accumulate.

    Wiping with Microfiber Cloth

    Wipe the lens with a microfiber cloth, using gentle circular motions. This helps remove any remaining residue and ensures a streak-free finish. If necessary, repeat the process until the lens is clean.

    Addressing Stubborn Stains

    For stubborn stains or residues, consider using specialized lens cleaning wipes. These pre-moistened wipes are designed to tackle tougher contaminants without causing damage to the lens.

    Common Mistakes to Avoid

    While cleaning your flashlight lens, it’s crucial to be aware of common mistakes that can lead to damage or diminished performance. Here are some key errors to avoid:

    1. Using Harsh Chemicals: Avoid using abrasive or corrosive chemicals, as they can damage the lens material and coatings. Stick to mild solutions recommended by the flashlight manufacturer.
    2. Improper Disassembly: Follow proper disassembly procedures outlined in the flashlight’s user manual. Incorrect disassembly can lead to damage or accidents, impacting the overall functionality of the flashlight.
    3. Ignoring Manufacturer Guidelines: Always adhere to the cleaning guidelines provided by the flashlight manufacturer. Deviating from these recommendations may void warranties or cause irreparable damage.
    4. Overlooking Lens Cleanliness: Neglecting regular lens cleaning can result in a buildup of dirt and contaminants, affecting both the light output and the longevity of the flashlight.

    Common Mistakes to Avoid During Flashlight Lens Cleaning

    MistakeConsequences
    Using Harsh ChemicalsDamages lens material and coatings
    Improper DisassemblyRisks damage or accidents during cleaning
    Ignoring Manufacturer GuidelinesMay void warranties or cause damage
    Overlooking Lens CleanlinessDiminished light output and reduced lifespan

    Why is it important to clean your Flashlight Lens?

    A dirty flashlight lens is not only a nuisance; it can also impair your vision. A study published in the journal Ophthalmology found that daily use of a dirty flashlight could result in impaired night vision up to 2 years later. In addition, dust and other debris on the lenses can reduce light transmission, causing difficulty reading even at close range.

    Here are five tips for cleaning your flashlight lens:

    1) Use a soft cloth moistened with rubbing alcohol or water to clean the lens’s exterior surface. Use moderate pressure while wiping to avoid scratching or harming the glass. Let dry completely before using again.- 

    2) Remove any dirt, fingerprints, or other pollutants by polishing with a fine-grade abrasive such as diamond powder (available online). Swab gently around each eye six times daily and then wipe off the residue. 

    3) To remove dried droplets from inside the light source unit housing where they may cause reflection problems when looking into an optical instrument such as binoculars or telescopes, immerse the unit in a gentle detergent solution, rinse thoroughly several times, and air dry. –

    4) If the lens is severely tarnished or does not respond to polishing, you may need to replace it.

    5) If your flashlight requires a new battery, clean and dry all connectors before replacing the battery. Although cleaning your flashlight lens is not particularly difficult, it can be time-consuming. If you follow these tips and procedures regularly, your flashlight will operate at its best for many years.

    What should NOT be used to clean a Flashlight Lens?

    A few things should not be used to clean a flashlight lens, including Windex, alcohol, ammonia, vinegar, or chlorine. These materials can damage the plastic lens and make it difficult to see in low-light situations. Additionally, all these chemicals will also corrode the metal parts of your flashlight.

    1. Windex: This is the worst thing you can use to clean a flashlight lens because it contains ammonia and other harsh chemicals that can damage the lens.

    2. Bleach: Bleaching your lenses with bleach will also damage them and may cause permanent blacking or distortion of the light output.

    3. Vinegar: Vinegar leaves an acidic residue that can further corrode your flashlight’s optics over time.

    4. Toothpaste: Toothpaste has abrasives that will scratch up your lens, causing clicking or hypersensitivity when used to shine a light on something; this is especially true if you have sensitive skin around your eyesight area.

    5. Alcohol: Alcohol will evaporate and leave a residue on your lens that can also cause damage.

    6. Chlorine: Chlorine bleach is extremely harsh and can easily strip away the phosphor coating from the lenses of lights, rendering them useless.

    How often should I clean my Flashlight Lens?

    How often should I clean my Flashlight Lens

    According to the Bureau of Land Management (BLM), a flashlight’s lens should be cleaned at least once every month or every two months if used regularly outdoors. When cleaning your flashlight lens, wipe it with a dry cloth or paper towel.

    How do I keep my Flashlight Lens clean?

    Keeping your flashlight lens clean is essential for two reasons: first, it prevents the light from being polluted, and second, it ensures that the light beam is as bright as possible. Here are five tips to help you keep your flashlight lens clean:

    1. always store your flashlight in a dry place

    2. use a cloth or microfiber towel to wipe down the exterior of the flashlight every time you use it

    3. avoid using canned air cleaner on plastic lenses – this can damage them over time

    4. periodically take off the front and back covers of your projector headlight unit to access all of its parts and clean them with a soft cloth and denatured alcohol wipes (alcohol will dissolve oil)

    5. use a fiberglass or plastic lens brush to clean the inside of the lens where light reflects from the illuminated object.

    Can I use alcohol to clean Flashlight Lens?

    While you may be able to use alcohol to clean other surfaces, it is not recommended for cleaning flashlight lenses. This is because alcohol can strip the lens’s protective coating and damage the light seal and Reflector. Too much alcohol will also cause smudging or fogging of your lens. Water or a non-alcoholic solution should always be used when cleaning any optics.

    How do I avoid getting dust on my Flashlight Lens?

    One of the most common problems that flashlight users face is getting dust on their lenses. This can reduce the brightness and visibility of your light, which can be dangerous if you need to use it in an emergency. There are a few simple steps that you can take to avoid this problem: 

    1) Make sure your flashlight is clean before each use. Remove any debris or fingerprints with a soft cloth or dry paper towel. 

    2) Store your flashlight in a cool, dark place where it will not be disturbed. Dust tends to accumulate on lenses over time, so keeping yours tidy will help prolong its lifespan and improve its performance.

    3) When you are traveling, make sure to pack a spare light bulb and battery. This will help avoid any unexpected repairs or replacements while away from home.

    How do you clean a flashlight reflector?

    If your flashlight reflector is not reflecting light as it should, you may need to clean it. Cleaning a flashlight reflector can be done using a cloth or microfiber pad soaked in mineral oil and water. Be sure to work the polish into the Reflector’s surface until the particles are removed.

    Do not use steel wool, carbide grit, ammonia cleaner, or other harsh chemicals; they could damage the plasticity of the Reflector.

    Final Words:

    As you can see, cleaning a flashlight lens is not that hard, and with just a few tips, the job becomes more accessible.

    Consider using baby oil instead of water for the stubborn case of grease on your flashlight. The oil will soak up all the dirt in no time and make it easy to clean your light. Just be careful before using oils; they’re not harmful to health but messy in aesthetic terms!

    If you are wondering what not to use while cleaning, we want to tell you that alcohol or other harmful substances can damage the flashlight and its parts. It is advisable to use a gentle brush or toothbrush since gentle scrubbing helps remove dust and dirt from tight spots like underneath caps of flashlights and battery compartments. Avoid using harsh abrasive materials as they might cause scratches on the lens surface.

    With some trial and error, most people keep their flashlights in great shape! 

    Click here if you like the post and want us to share it with your friends and family.

  • Ultimate Guide on How to Clean a Laser Lens: A Comprehensive Approach

    Maintaining the cleanliness of a laser lens is crucial for the optimal performance and longevity of various devices. A dirty lens can significantly impact functionality, whether it’s a CD/DVD player, a laser printer, or a high-end scientific instrument. This comprehensive guide will explore the importance of keeping your laser lens clean, signs of a dirty lens, and the consequences of neglecting this vital maintenance task.

    When it comes to cleaning lenses, you have a variety of options. There are many different types of lens cleaners available on the market, but they all have advantages and disadvantages. To find out which is best for your lens, check out our recommended solutions below.

    ImageProductDetailPrice
    13 in 1 Fiber Optic Cleaning Tool kit

    13 in 1 Fiber Optic Cleaning Tool kit

    • Optical Fiber Microscope
    • Fiber optic cleaning cotton swab
    See on Amazon
    YICIZOL Optic Fiber Cleaning Inspection Kits

    YICIZOL Optic Fiber Cleaning Inspection Kits

    • 400 Times Fiber Connector
    • Small size, one-handed, convenient and fast
    See on Amazon
    Camera Lens Cleaning Kit, 10-in-1 Camera Cleaning Kit

    Camera Lens Cleaning Kit, 10-in-1 Camera Cleaning Kit

    • Safety, Simple, Effective, Static-free, Multi-propuse, unique cleaning kit for your life!
    See on Amazon
    Professional DSLR Camera Cleaning Kit 

    Professional DSLR Camera Cleaning Kit 

    • High-Power Biological Microscope for Students
    See on Amazon
    AmScope MLA-Kim Microscope Maintenance Kit

    AmScope MLA-Kim Microscope Maintenance Kit

    • 1/4 Oz Type B medium viscosity immersion oil for better microscopy images and prolonged use
    See on Amazon

    Before we learn how to care for the laser lenses, we need to know how to remove parts like the lens holder of the machine. To read all about it, check out the instructions.

    What can I use to clean the laser lens?

    What can I use to clean the laser lens

    There are a few ways to clean laser lenses:

    1, Use a lint-free cloth to remove any dirt and dust from the lens before cleaning it with the following products

    a. A soft cloth that has been soaked in isopropyl alcohol (isopropanol)

    b. Isopropyl alcohol wipes

    Understanding Laser Lens Cleaning

    The laser lens plays a pivotal role in the functionality of devices such as CD/DVD players, laser printers, and scientific instruments. Over time, contaminants like dust, fingerprints, and other debris can accumulate on the lens, affecting performance. Recognizing the signs of a dirty lens is essential for timely intervention.

    Signs of a Dirty Lens and Consequences

    A dirty laser lens may manifest through blurry images, erratic printing, or skipping during playback. Neglecting to clean the lens can lead to permanent damage, reduced device lifespan, and compromised output quality.

    Preparing for Cleaning

    Before delving into the cleaning process, it’s crucial to take some preparatory steps to ensure the safety of both the lens and the device.

    Safety Precautions

    Always power off and disconnect the device before attempting to clean the laser lens. This prevents accidental damage and ensures a safe cleaning environment. Additionally, grounding yourself or using an anti-static wrist strap helps mitigate the risk of electrostatic discharge.

    Tools and Materials

    To clean a laser lens effectively, gather the necessary tools and materials. These include a can of compressed air, a soft microfiber cloth, a lint-free Q-tip or a lens pen, and a suitable cleaning solution. Select the cleaning solution based on the type of contaminants present on the lens.

    5 Step-by-Step Cleaning Process

    Cleaning a laser lens involves a systematic approach to ensure thorough removal of contaminants without causing damage. Let’s explore each step in detail.

    A. Inspection

    Begin by inspecting the lens for visible contaminants. Identify the type of dirt or debris present to determine the appropriate cleaning method. If the lens is heavily soiled, it may require specialized cleaning solutions.

    B. Dust Removal

    Use compressed air to remove loose dust particles from the lens. Ensure the can is held upright during application to prevent any propellants or liquids from escaping. Adjust the air pressure according to the device’s specifications to avoid potential damage.

    Common Compressed Air Pressure Settings

    Device TypeRecommended Air Pressure
    CD/DVD Players20-30 PSI
    Laser Printers15-25 PSI
    Scientific InstrumentsVaries based on model

    C. Cleaning Solutions

    Select a cleaning solution suitable for the type of contaminants on the lens. Avoid alcohol-based solutions for certain lenses, as they may cause damage. Apply the solution sparingly and in a controlled manner to prevent any liquid from seeping into the device.

    ContaminantRecommended Cleaning Solution
    Dust and DirtIsopropyl alcohol or lens-cleaning solution
    FingerprintsDistilled water with a small amount of dish soap

    D. Microfiber Cloth

    When wiping the lens, use a clean and soft microfiber cloth. Employ a gentle, circular motion to avoid streaks or damage. Ensure the cloth is free from any abrasive particles that could scratch the lens.

    E. Q-tip or Lens Pen

    For precision cleaning, use a Q-tip or a lens pen. Ensure these tools are clean and free from debris before application. Use them delicately to avoid scratching the lens surface.

    ContaminantPreferred Tool
    Dust and DirtQ-tip or Lens Pen
    FingerprintsLens Pen

    3 Tips and Best Practices

    Maintaining a regular cleaning schedule is essential for optimal device performance. Consider the following tips and best practices to ensure effective lens cleaning.

    • Frequency of Cleaning: The frequency of cleaning depends on the device type and the environment. Devices in dusty environments may require more frequent cleaning.
    • Additional Precautions for High-End Equipment: High-end scientific instruments may have specific cleaning requirements outlined in the manufacturer’s guidelines. Always refer to these guidelines for specialized equipment.
    • Tips for Maintaining a Dust-Free Environment: Minimize dust accumulation by keeping devices covered when not in use and placing them in clean, well-ventilated areas.

    3 Common Mistakes to Avoid

    While cleaning a laser lens, it’s crucial to avoid common mistakes that could lead to damage or ineffective cleaning.

    • Using Abrasive Materials or Incorrect Cleaning Solutions: Abrasive materials and incorrect cleaning solutions can scratch the lens surface. Always use recommended tools and solutions.
    • Cleaning a Powered-On Device: Cleaning a lens while the device is powered on increases the risk of damage. Ensure the device is completely powered off before beginning the cleaning process.
    • Overlooking Hidden Areas Around the Lens: Contaminants may accumulate in hidden areas around the lens. Take extra care to inspect and clean these areas during the cleaning process.

    Can I use a cotton swab as a match?

    No. Use cardboard or wooden swab holders only, and acetone will dissolve the plastic holders of the swab.

    Before cleaning the lens using acetone, clean any sneezing or breathing stains using distilled water and let it dry.  

    You do not have to follow the following steps unless the lens is still not cleaned.

    Take a new cotton swab and soak it in pure and distilled vinegar. Using a little pressure, clean both sides of the lens.  

    Now soak another cotton swab in acetone and use it to clean off vinegar residues. For the liquid to evaporate, remember to use slight pressures.

    What can I use if I don’t have acetone?

    You can use some methyl or ethyl alcohol instead of acetone. You might use it, but alcohol evaporates slowly compared to acetone and might leave residues on the lens. Therefore, it is better to use acetone.  

    If the lens has scratches or burns, you cannot clean it properly and have to replace it.  

    When using acetone, be careful as it is highly flammable. Please avoid contact with your skin and keep it out of children’s reach. Before using acetone, see if there is any restriction in the manual.  

    Here are a few points that you should remember about different laser optics- 

    For metal optics, metal polishers can be used for cleaning. Use the latex glove to remove stubborn marks and follow steps 1 and 2.  

    Do not follow any of the steps above for mirrors coated with soft gold, as the mirrors have delicate surfaces. A non-contact method is preferred, like rinsing with acetone and spraying dry nitrogen.  

    For mirrors coated with solid gold, follow steps 1 through 4. These mirrors have harsh surfaces; therefore, you can use acetone. But the mirrors cannot come in contact with water, as the coatings may peel off if it comes in contact with water.  

    For Zinc Selenide (ZnSe) focusing lenses, you blow off any dirt from the surface of the lens using compressed air. Then follow steps 1 and 2.  

    How to clean laser focus lenses and mirrors?

    You can clean laser focus lenses and mirrors with a rag soaked in rubbing alcohol.

    Cleaning lenses or mirrors are essential to maintain their clarity. Cleaning the lenses of your eyeglasses can help prevent eye infections caused by microbes on the surface of your lens.

    Blow off any dirt using compressed air or a soft-haired brush.

    Take the lens out and wash it with the cleaning liquid.

    Take a drop of the cleaning liquid and let it stay on the lens for a minute.

    Using a lens tissue, wipe the fluid off.

    Avoid doing the following-

    Do not touch the lens with bare fingers.

    Avoid any contact between the lens or the material and your skin.

    Do not wear cotton gloves.

    Avoid using lenses that are burnt or scratched.

    How often should I clean my laser lens?

    It would be best to clean the laser lens daily to prevent dust from getting in the tube and causing static.

    If the lens does get damaged, it’s best to stop using it until you can get a new one, as the lens requires exact alignment to work, and replacement will be difficult.

    Can you clean a laser lens with rubbing alcohol?

    No, you cannot clean a laser lens with rubbing alcohol. The main ingredients in rubbing alcohol are isopropyl alcohol and water, which are unsuitable for cleaning lasers because they can break down the lens material.

    Instead, it would be best to use a cleaner designed for your specific laser lens.

    How do you clean a fiber laser lens?

    To clean a fiber laser lens, you will need to use a mild detergent. You can also use a cotton swab and put it in some alcohol or water for about 20 minutes.

    If the lens is heavily soiled, you may need to take it apart and soak the components in some solvent before cleaning them individually.

    Does isopropyl-alcohol damage lens coating?

    It is not recommended to use Isopropyl alcohol on lenses with coatings because it can damage the coating.

    However, it is okay to use Isopropyl alcohol if you use old lenses that do not have any coatings.

    How do you make a lens-cleaning solution?

    To make a lens cleaning solution, you need to mix distilled water and isopropyl alcohol. Then add some distilled vinegar to the mixture.

    Once this preparation is done, pour the solution into a spray bottle and shake it well before spraying it on your lenses. That will clean the dirt off your lenses without any residue.

    Final Words:

    As a professional optometrist, I have had the opportunity to work with many different types of lenses. I’ve used many different lens-cleaning solutions over the years, but none were as effective as the one listed below.

    If you use your laser to do eye exams or want to ensure that your lenses are clean and ready for use, this is the solution for you! This is an easy-to-follow guide on how to clean your laser lens using just a few household items. I hope this guide helps you get back to work faster than ever!

    VIII. Resources and References

    For those looking to delve deeper into the world of laser lens cleaning, here are some recommended resources and references:

    1. Manufacturer Guidelines: Check the official guidelines provided by the manufacturer for specific devices.
    2. Cleaning Products: Explore a range of recommended cleaning products and tools.
    3. Scientific Studies: Delve into scientific studies that highlight the impact of lens cleanliness on device performance.

    By consulting these resources, you can enhance your understanding of laser lens cleaning and make informed decisions for maintaining your devices.

  • 5 Simple Steps to Cleaning Flashlight Properly – Choosing the Right Method

    5 Simple Steps to Cleaning Flashlight Properly – Choosing the Right Method

    Cleaning your flashlight is an essential part of keeping it in good condition. Not only will it perform better, but you’ll also be protecting your hands and eyes from harmful light rays. 

    Are your flashlights always ending up dirty? Well, it’s time to start cleaning them up! But which method should you use? In this post, we’ll outline five simple steps to help you properly clean your flashlight. We’ll also recommend the proper method for each type of flashlight so you can ensure you’re cleaning them the right way every time. Let’s get started!

    ImageProductDetailPrice
    13 in 1 Fiber Optic Cleaning Tool kit

    13 in 1 Fiber Optic Cleaning Tool kit

    • Optical Fiber Microscope
    • Fiber optic cleaning cotton swab
    See on Amazon
    YICIZOL Optic Fiber Cleaning Inspection Kits

    YICIZOL Optic Fiber Cleaning Inspection Kits

    • 400 Times Fiber Connector
    • Small size, one-handed, convenient and fast
    See on Amazon
    Camera Lens Cleaning Kit, 10-in-1 Camera Cleaning Kit

    Camera Lens Cleaning Kit, 10-in-1 Camera Cleaning Kit

    • Safety, Simple, Effective, Static-free, Multi-propuse, unique cleaning kit for your life!
    See on Amazon
    Professional DSLR Camera Cleaning Kit 

    Professional DSLR Camera Cleaning Kit 

    • High-Power Biological Microscope for Students
    See on Amazon
    AmScope MLA-Kim Microscope Maintenance Kit

    AmScope MLA-Kim Microscope Maintenance Kit

    • 1/4 Oz Type B medium viscosity immersion oil for better microscopy images and prolonged use
    See on Amazon

    7 Cleaning Steps to follow

    You can use flashlights in emergencies, but they can also be a breeding ground for bacteria and fungus. To keep your flashlight clean and free of contaminants, follow these simple steps:

    Disconnect the battery if it’s not in use.

    Wipe the entire light with a damp cloth or cotton ball. Make sure to clean all the crevices and corners.

    If the light has a lens cover, remove it and wipe the inside with a cloth or cotton ball.

    Wipe off any dirt or dust on the lens using a dry cloth or paper towel (don’t use water). 

    Replace the lens cover with a removable one and tighten using screws or bolts if necessary. 

    Reattach the battery if desired and turn on the flashlight to ensure everything is working correctly. 

    Store your flashlight in an area where it will not be exposed to moisture or sunlight (a dark place is best).

    8 Best Methods to Clean A flashlight 

    We’ll show you eight quick and easy ways to clean your flashlight, so you can keep it working its best. From removing fingerprints to cleaning the lens, there’s a method for everyone!

    1. Use warm water and soap

    Mix a tablespoon of soap with a full cup of warm water and pour it into the flashlight. Swirl the flashlight around in the water to clean all surfaces. Let it sit for a few minutes so the dirt and debris can be washed away, then dry it off.

    2. Use alcohol or Lysol spray

    Pour either alcohol or Lysol drizzle into the flashlight and turn it on full blast until the liquid has been sprayed throughout. Please turn off the light and allow it to air-dry completely before using it again. 

    3. Use a cloth wrung out in vinegar or lemon juice

    Wet a cloth with vinegar or lemon juice, wring it out well, and place it over the light bulb where you want to clean it. Please turn on the light while holding down on the cloth until dirt and debris fall onto it; then, hang up the cloth to dry completely before using it again. 

    4. Use baking soda mixed with water as a natural cleaner

    Mix 1/2 cup of baking soda with 1/2 cup of cold water in a bowl, then pour this solution into your flashlight’s lens area and let it sit for a few minutes. Use a tissue to clean off the baking soda and any dirt or debris dislodged. Let the flashlight air-dry before using it again.

    5. Buy a flashlight cleaning kit

    These kits typically contain a brush, disinfectant wipes, and a lens scraper. Use the brush to scrub dirt and debris off the light bulb; use the wipes to clean off any fingerprints or smudges on surfaces; and use the lens scraper to remove any specks or dust particles from lenses or reflectors.

    6. Use vinegar

    Vinegar effectively cleans all types of surfaces, including glass and plastic lenses. Mix equal vinegar and water, spray it on the lens and wipe it off with a cloth or paper towel. Be sure to rinse thoroughly after use.

    7. Use hydrogen peroxide

    Hydrogen peroxide is an excellent cleaner for all surfaces, including lenses. Mix three parts hydrogen peroxide with one part water, spray it on the lens, and wipe it off with a cloth or paper towel. Be sure to rinse thoroughly after use.

    8. Use a vacuum cleaner and dustpan

    Put the vacuum cleaner attachment on the dustpan and turn it on. Vacuum up all the dirt, debris, and oil accumulated on your flashlight. Make sure to avoid any contact with the lens or batteries.

    Why Cleaning Matters

    Maintaining a clean flashlight is integral to ensuring optimal performance and longevity. Dirt and debris accumulation, often overlooked, can significantly impact the functionality of your flashlight. This section explores the various aspects of why cleaning matters and sheds light on the consequences of neglecting flashlight cleanliness.

    A. The Impact of Dirt and Debris on Flashlight Performance:

    IssueDescription
    Reduced Light OutputAccumulated dirt on the lens or reflector can obstruct the light beam, leading to diminished brightness.
    Heat BuildupDebris around the LED or bulb can impede proper heat dissipation, potentially causing overheating and reducing the lifespan of the light source.
    Electrical ConnectivityDust and grime in the battery compartment may interfere with electrical connections, causing intermittent or complete failure of the flashlight.
    CorrosionMoisture and dirt can lead to corrosion on electrical contacts, affecting conductivity and potentially damaging internal components.

    B. Common Issues Arising from Neglecting Flashlight Cleanliness:

    IssueDescription
    Flickering or Inconsistent LightDirty or corroded contacts can result in unreliable electrical connections, leading to flickering or erratic light output.
    Lens ScratchesNeglecting to clean the lens properly can result in scratches, diffusing the light and reducing clarity.
    Internal Component DamageOver time, dirt and debris can accumulate inside the flashlight, causing damage to internal components such as the LED or bulb, compromising performance.

    C. Benefits of Regular Cleaning:

    BenefitDescription
    Improved PerformanceRegular cleaning ensures optimal light output, consistent performance, and a longer lifespan for your flashlight.
    Extended LifespanCleaning prevents the buildup of damaging elements, preserving the integrity of internal components and increasing the overall lifespan of the flashlight.
    Enhanced ReliabilityA well-maintained flashlight is more reliable during critical situations, providing consistent illumination when needed the most.
    Cost SavingsPreventive maintenance through regular cleaning reduces the likelihood of component failure, saving money on replacements and repairs.

    In summary, the impact of dirt and debris on flashlight performance is multifaceted, affecting light output, heat dissipation, and electrical connections. Neglecting cleanliness can lead to issues such as flickering, lens scratches, and internal component damage. On the other hand, regular cleaning brings a host of benefits, including improved performance, extended lifespan, enhanced reliability, and potential cost savings. It underscores the importance of incorporating flashlight cleaning into regular maintenance practices for users to enjoy the longevity and effectiveness of their lighting equipment fully.

    Effect of cleaning a flashlight on its beam life

    When it comes to cleaning your flashlight, it’s essential to understand the effect of cleaning on its beam life. To keep the beam strong and its light output consistent, choose the suitable method that suits your flashlight and follows the instructions carefully.

    Four methods effectively clean flashlights – dry cleaning, ultrasonic washing, air-drying, and manual cleaning.

    Dry cleaning is the most delicate and takes the longest time, but it is the most effective in preserving the light beam.

    Ultrasonic washing is the fastest and least delicate method, but it may not effectively remove all the dirt and debris.

    Air-drying is the least time-consuming and effective in removing most dirt and debris, but it may leave the flashlight with a film on the lens.

    Manual cleaning is the most time-consuming but the most effective in removing all the dirt and debris.

    Common Mistakes to Avoid

    Ensuring your flashlight’s proper care and maintenance involves avoiding common mistakes that could compromise its functionality. Here, we highlight some critical errors to steer clear of, providing insights into the potential consequences of each mistake.

    A. Using Abrasive Materials:

    Mistake DescriptionConsequences
    Cleaning with Rough MaterialsScratches on the lens or body of the flashlight can occur, impacting both the aesthetic and functional aspects of the device.
    Damaging Protective CoatingsAbrasive materials can remove protective coatings on the lens or body, making the flashlight more susceptible to future damage and reducing its overall durability.

    B. Neglecting to Check for Water Damage:

    Mistake DescriptionConsequences
    Internal Component DamageFailing to check for water damage may result in internal corrosion, electrical shorts, and damage to critical components such as the LED or bulb.
    Reduced Water ResistanceOver time, neglected water damage can compromise the flashlight’s water-resistant features, rendering it less effective in wet or humid conditions.

    C. Reassembling Incorrectly:

    Mistake DescriptionConsequences
    Electrical MalfunctionsIncorrect reassembly may lead to poor electrical connections, causing the flashlight to malfunction or fail altogether.
    Increased Risk of DamageReassembling parts improperly may put unnecessary stress on components, increasing the risk of damage during regular use or maintenance.

    Avoiding these common mistakes is crucial for maintaining the longevity and effectiveness of your flashlight. Using non-abrasive cleaning materials, regularly checking for water damage, and ensuring correct reassembly will contribute to the overall reliability and performance of your flashlight, keeping it in optimal condition for when you need it most.

    Things you should not do when cleaning a flashlight

    There are a few things you should never do when cleaning it. For example, never dry it with a cloth or a dryer – this will create moisture problems in the future. Instead, always dry it properly by using a towel or air-drying.

    Another no-no is using harsh chemicals or abrasives – these can damage the flashlight’s internals.

    Remember to choose the correct bulb for your flashlight before cleaning it, and ensure you know how to clean it properly.

    Finally, keep your flashlight clean by regularly cleaning the lens and the body – these are the most common areas that get dirty.

    How to choose the proper method of cleaning your flashlight

    Proper method of cleaning your flashlight

    There are a few things to consider when selecting the best way of cleaning your flashlight. The material, size, and shape of your flashlight all play a role in how you should clean it.

    If you’re like most people, your flashlight is one of your most-used items. And, with good reason – it’s convenient when you need to see in the dark or during a power outage.

    However, keeping your flashlight clean and free of bacteria is essential for its own sake and safety. That’s because dirty flashlights can cause eye injuries and even sickening infections.

    Purpose 

    Different flashlights are designed for various purposes. For example, some are intended as emergency lights, while others are meant for hunting or camping. Choosing a flashlight that suits your needs and uses would be best.

    Materials

    The material of the flashlight determines how you should clean it. If your flashlight is made of a hard material, like plastic, you should dry it using a cloth or air-drying. You should use ultrasonic wash if your flashlight is made of softer metal or glass.

    Body and Lens

    The size and shape of the flashlight also play a role in how you should clean it. If your flashlight has a large body and lens, you may want to clean them manually. If your flashlights are smaller and have limited storage space, try one of the other methods.

    Cleaning Materials 

    The best way to clean a flashlight is by using a safe and effective cleaner. Flashlights can be cleaned with many materials, but some of the best include water, soap, and oil.

    Cleaning Period

    It would help if you cleaned your flashlight every time you used it. It all depends on your flashlight and how often it’s used.

    For example, if you’re using a disposable flashlight, you should clean it after every use. If you’re using a reusable flashlight, you can clean it once a week or every two weeks, whichever works better for you.

    Why? Because dirt and dust can build up over time and eventually cause your flashlight to malfunction or even become dangerous. By regularly cleaning your flashlight, you’ll be able to keep it working perfectly for years to come.

    Waterproof or Water Resistant

    Flashlights are often used in environments where water is present, so you must ensure that your flashlight is waterproof and water-resistant. Waterproofing means the flashlight can be submerged in water up to a certain depth and still work, and water resistance means that the flashlight will not be damaged by water, even if it gets wet.

    If you’re looking for a waterproof flashlight, choose one rated. Read the manufacturer’s instructions carefully before using the flashlight, as some may require extra care when cleaning. For a water-resistant flashlight, you can choose either an entirely water-resistant one or one with a moisture-resistant coating.

    How to clean a flashlight: manual method

    The most common way of cleaning a flashlight is by hand. To clean it, first, ensure you have the right supplies. You will need soap, water, and a towel or cloth. Soap will help remove dirt and debris from the flashlight’s surface, while water will dissolve any soap residue.

    Wipe your light with a damp cloth until all the dirt and dust are gone. If your light has fingerprints or other grease buildup on its exterior, use an alcohol-based cleaner to remove it without harming the plastic.

    Inspection

    If your flashlight uses a battery, you should always clean it using water. Suppose the light emits an intense and long beam of light. You can use a chemical cleaner such as white vinegar or ammonia diluted with water to eliminate grease and oils on electronic parts (lamp modules, etc.). Alternatively, you can use a spin cleaning method to quickly spin the flashlight around in circles while rubbing its surface with a cloth or paper towel.

    5 Tips for cleaning a damaged flashlight

    Flashlight maintenance is essential to keep them working correctly and looking good. Here are five tips for cleaning a damaged flashlight:

    Remove the battery if possible, and this will help minimize the chance of accidental discharge.

    Wipe the light with a dry cloth to remove dust or debris.

    Blow out the light with a can of compressed air to remove any built-up dirt, dust, or saliva.

    Spray a little anti-bacterial cleaner inside and outside the light housing to kill any bacteria that may have grown during use.

    Finally, wipe down the lens with a dry cloth to remove any residual cleaner

    5 Steps to Clean Out the Battery and Corrosion:

    Flashlights can be handy when you need to see in the dark, but they can also take a lot of abuse. Over time, the battery will lose power and may even start eroding, leading to poor performance and dangerous electrical shocks.

    Here are five steps that will help you clean out your flashlight and keep it working correctly:

    Remove the battery if it’s possible. This is important because batteries contain chemicals that can damage electronics if left in them.

    Scrub the entire light with a wire brush or a toothbrush to remove any dirt, dust, or debris. Make sure to get into the crevices and corners!

    Rinse the light with water and dry it off completely before replacing the battery. Be sure to seal the battery compartment tightly with tape or silicone sealant when you’re done so that water cannot enter again during storage or use. 

    Store your light in a dry place away from direct sunlight and heat, which can cause damage over time. And last but not least, be sure to replace your flashlight every three years or when its battery shows signs of wear!

    This guide is designed to help you take care of your flashlight. If you ever notice anything wrong with it, don’t hesitate to contact the manufacturer or a qualified professional.

    Additional Tips and Ideas

    1. Lubricate and Protect Your Flashlight

    Keeping your flashlight clean and lubricated is essential to keep it working correctly.

    Here are five simple steps to follow:

    Store your flashlight in a dry location to prolong its life.

    Lubricate and protect your flashlight’s lens with an o-ring or silicone sleeve every time you use it.

    Choose a method to protect the lens using an o-ring or silicone sleeve.

    Ensure the lens is clean before lubricating and protecting it.

    Use a light coating of petroleum jelly on the threads of your flashlight’s head to protect them from dirt or dust.

    2. Store Your Flashlight Correctly

    Keeping your flashlight in good condition is essential for your safety. Follow these simple tips to make sure your flashlight is clean and safe to use:

    Always store your flashlight in a cool, dry place.

    When cleaning, use the correct method – either with a household cleaner or water and vinegar.

    If you break the light cover, replace it as soon as possible to keep your flashlight looking new.

    Always store your flashlight in a place that is easy to access – like a safe or cabinet.

    3. Take Safety Precautions

    Cleaning a flashlight is not as difficult as one might think, and a few simple steps will help make the process easier and safer for you.

    First, several options are available for cleaning a flashlight – choose the one best suited for the flashlight type and the flashlight’s cleaning needs.

    Second, store your flashlight safely where children and pets cannot reach it.

    And finally, when cleaning a flashlight, always be sure to use the correct method.

    Make sure to wear gloves to avoid injuries, and follow the cleaning instructions provided by the flashlight manufacturer. With these simple steps, you’ll clean your flashlight like a pro in no time!

    4. Take Out the Leaking Battery

    If your flashlight is not working as well as it did, there’s a good chance that one or more batteries will start to leak.

    To fix this problem, remove the leaking battery and replace it with a new one. Follow the manufacturer’s instructions for safely canning and installing batteries.

    5. Remove the Battery Acid

    If you notice any dirt buildup or corrosion, it’s time for an overhaul. This includes taking your flashlight apart and cleaning everything inside and out – make sure to clean the battery compartment too! To remove ink or grease, mix equal parts of rubbing alcohol and water and use it on the flashlight’s lens, body, or other areas that may be affected. Finally, always keep a toothbrush handy if you need to remove fingerprints or grease deposits!

    Testing After Cleaning

    A. Verifying Functionality Post-Cleaning:

    After the cleaning process, it is essential to verify the functionality of your flashlight to ensure that it operates at its full capacity. This involves checking various aspects, including turning it on and off, testing different modes (if applicable), and confirming that the light output is consistent. Pay attention to any irregularities and address them promptly.

    B. Troubleshooting Common Issues:

    If any issues arise during the post-cleaning functionality check, it’s crucial to troubleshoot systematically. Refer to the user manual for guidance, inspect internal components, and retrace the cleaning steps. Addressing problems promptly will help maintain the flashlight’s optimal performance and reliability.

    What are some of the dangers of cleaning a flashlight with solid chemicals?

    Strong acids and alkalis strip the protective outer coating from cells in your eyes, skin, or other exposed areas. These elements can lead to

    An eye injury

    Flushing of the face and neck due to accumulation of fluids behind the ear drums (otitis media)

    Chemical burns on skin or mucous membranes, excessive salivation or vomiting

    Pulmonary edema due to absorption through the lungs of hydrofluoric acid (HF)

    Stinging sensations on exposure because nicotine is an irritant contact sensitizer

    In extreme cases, it may even cause death! If you are cleaning a flashlight with any cleaner that contains corrosive ingredients such as sulfuric acid, lye solutions, ammonia, etc.

    First, test the cleaner on a small spot near where you will be using it. If there is no reaction within 30 minutes, then proceed. However, if there is evidence that irritation has occurred, discontinue use immediately!

    What is the best way to clean a CR2032 battery?

    I discovered that cleaning a CR2032 battery with this refined vinegar method is very simple and rarely needed. However, if the battery does become dirty, there are some easy steps that you can take to ensure its continued longevity.

    The first step is to rinse it off thoroughly with water.

    Next, immerse it in a container of distilled vinegar (5%-10%).

    Let the battery soak for several hours or overnight, and then remove it from the vinegar solution and dry it off completely.

    Finally, put on gloves while unscrewing the top of the battery housing so that you do not get any contact with acid or chemicals.

    Is it necessary to clean my light every time I use it, or can it be stored dirty and used later?

    It is not necessary to clean a light every time you use it, but it is recommended that you do so to maintain its brightness and luster. You can store a light dirty and use it at a later time. However, if you notice any signs of corrosion or damage, it is recommended that you clean the light immediately.

    What should I do if my flashlight doesn’t seem to get as dirty as it used to?

    Most flashlight owners are probably familiar with the issue of flashlights getting dirty relatively quickly. This is because many people use them to read or work in low-light situations, and as a result, the beam is constantly being drawn across all sorts of surfaces.

    To prevent your flashlight from becoming dirty too frequently, you can try these tips:

    Store it in an area where there is less dust and debris buildup. 

    Try using a different lens, if possible, to reduce the intensity of the beams. 

    Please keep it clean by wiping down its exterior every time you use it.

    Can I use a vacuum cleaner to clean my flashlight?

    Most likely not. Vacuum cleaners are designed to remove dirt and debris but are ineffective at cleaning delicate items like flashlights. Even if you use the highest setting on your vacuum cleaner, your flashlight will likely become damaged. Instead of using a vacuum cleaner, try using a cloth or paper towel to clean your flashlight.

    How do I clean my flashlight using just water?

    Cleaning your flashlight with water is a great way to keep it shining brightly and be sure it’s bacteria-free. All you need to do is fill a pot or basin with cold water and place the flashlight inside. Soak for at least 5 minutes, take the light out, and rinse any excess water thoroughly. Finally, dry it off using a cloth or paper towel.

    Is it safe to use bleach or harsh chemicals to clean my flashlight?

    When cleaning your flashlight, use a diluted solution of soap and water. Do not use bleach or harsh chemicals, as these can damage the light housing and lens. Always store your flashlight safely when not in use to avoid accidents.

    What are some of the best methods for cleaning a flashlight using oil or gel?

    There are various ways to clean a flashlight using oil or gel, but the best method depends on the type and configuration of your flashlight.

    You can use oils to remove dirt, dust, and fingerprints, while gels effectively remove grease and scuff marks. Both oils and gels require some time to work their magic, so it is essential to wait until the area is completely dry before putting your flashlight back together. Furthermore, ensure not to use harsh chemicals or abrasive cleaners when cleaning your flashlight – this could damage its finish.

    What is the best way to dry my flashlight after cleaning it?

    While there are many different ways to dry your flashlight, one of the simplest and most efficient is to use a paper towel. Place the flashlight on top of the paper towel and allow it to air-dry. This method is most effective if you cannot access fans or an electronic air cleaner.

    Do any special tools or supplies need to be purchased to clean a flashlight effectively?

    While most flashlights can be cleaned with a basic household cleaner, some models may require the purchase of specific tools or supplies. For example, sure lithium-ion batteries should not be boiled and must be soaked in water for several hours to dissolve the battery casing. You might also need to purchase an optic lens cloth if your flashlight uses one.

    Final Words

    Cleaning a flashlight is an important task that can help keep your flashlight operational for longer. Following the seven simple steps above, you can clean your flashlight effectively and safely. Make sure to store your flashlight correctly and take safety precautions when cleaning it. Finally, please take out the leaking battery and remove the battery acid before putting it back in the flashlight.