Using a light microscope is a great way to learn about the world around you. When students first begin learning about biology, they usually focus on using microscopes to examine individual cells. However, a light microscope is also an excellent way to understand biological processes such as photosynthesis and cellular respiration.
A light microscope is a device that magnifies objects many times, up to 10,000x. A cheap and simple alternative to these costly microscopes is the essential handheld microscopes that you can buy for under $10. These magnifications range from 4x to 400x and can be used to inspect various materials such as food, insects, fossils, and minerals.
In this article, we will discuss how to use a light microscope and provide step-by-step instructions on how to start with basic microscopy in just 10 minutes. We will teach you what equipment you need and how to use it.
| Image | Product | Detail | Price |
|---|---|---|---|
 | Carson MicroBrite Plus 60x-120x LED Lighted Pocket Microscope |
| See on Amazon |
 | Elikliv LCD Digital Coin Microscope |
| See on Amazon |
 | AmScope M150 Series Portable Compound Microscope |
| See on Amazon |
 | PalliPartners Compound Microscope for Adults & Kids |
| See on Amazon |
 | Skybasic 50X-1000X Magnification WiFi Portable Handheld Microscopes |
| See on Amazon |
Understanding the Basics of Light Microscopy: Illuminating the Foundations
Definition and Principles of Light Microscopy
Light microscopy, at its essence, is the art of magnifying and observing specimens using visible light. This powerful technique relies on the fundamental principles of optics to unravel the mysteries of the microcosm. By leveraging the interaction of light with specimens, scientists can delve into a world otherwise hidden to the naked eye.
| Term | Definition |
|---|---|
| Light Microscopy | A technique utilizing visible light to magnify and observe specimens, revealing details not perceptible to the naked eye. |
| Optics | The study of light behavior, essential in understanding how light interacts with specimens and lenses to produce magnified images. |
| Specimen | The object under observation, which can range from biological samples like cells to inanimate materials such as crystals. |
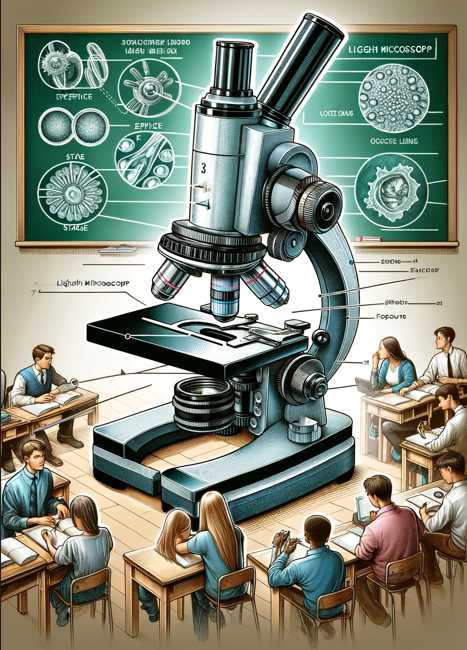
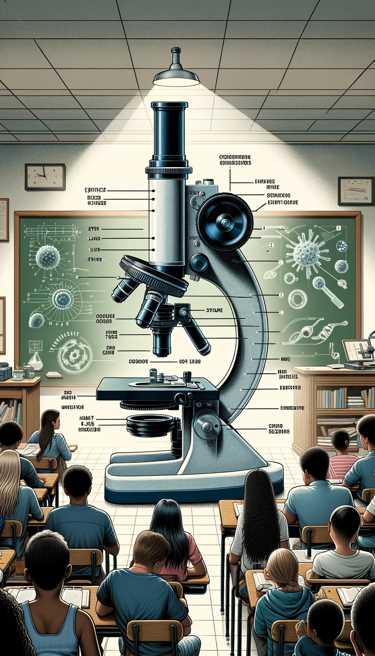
Components of a Light Microscope: Unveiling the Mechanism
The heart of any light microscope lies in its components, each playing a crucial role in the magnification and visualization process.
| Component | Function |
|---|---|
| Objectives | A set of lenses closest to the specimen, responsible for magnifying the image. Microscopes often come with multiple objective lenses, each offering different levels of magnification. |
| Eyepiece | The lens closest to the observer’s eye, further magnifying the image produced by the objective. Typically, microscopes have eyepieces with 10x magnification. |
| Stage | The platform where the specimen is placed for observation. It often includes stage clips or a mechanical stage to secure and manipulate the specimen easily. |
| Condenser | Positioned beneath the stage, the condenser focuses and concentrates light onto the specimen, enhancing contrast and brightness. Adjustable diaphragms control the amount of light reaching the specimen. |
| Light | The light source, illuminating the specimen for observation. It can be built into the microscope or an external source, ensuring proper illumination for clear imaging. |
Understanding these components provides the foundation for mastering the art of light microscopy. Each element harmoniously contributes to the creation of detailed and vivid microscopic images. As we delve deeper into the microscopic world, these components will prove to be our guiding lights.
Uses of Light Microscope Parts:
Light microscopes are invaluable tools that enable scientists, researchers, and students to explore the hidden intricacies of the microcosm. Understanding the uses of each microscope part is paramount to harnessing the full potential of this scientific instrument.
Objectives: Magnifying the Microscopic Landscape
Objectives, the primary lenses closest to the specimen, are pivotal in determining the level of magnification. Microscopes typically come with multiple objective lenses, each serving a unique purpose and magnification level.
| Type | Magnification | Use |
|---|---|---|
| Low Power | 4x to 10x | Ideal for locating specimens and getting an overview of the sample. |
| High Power | 20x to 40x | Suitable for detailed observation and analysis of cellular structures. |
| Oil Immersion | 100x | Used with a special immersion oil to achieve the highest magnification, essential for studying minute details such as bacteria and subcellular structures. |
Eyepiece: The Gateway to Microscopic Realms
The eyepiece, also known as the ocular lens, further magnifies the image produced by the objective. Typically featuring 10x magnification, it plays a crucial role in enhancing the observer’s view and facilitating detailed analysis.
| Type | Magnification | Use |
|---|---|---|
| 10x | 10x | Standard eyepiece magnification, providing a clear and well-detailed view of the specimen. |
| 15x/20x | 15x/20x | Specialized eyepieces for enhanced magnification, useful in situations demanding increased detail. |
Stage: Secure Platform for Observation
The stage is the platform where the specimen is placed for observation. Equipped with stage clips or a mechanical stage, it ensures the stable positioning of the specimen, allowing for easy manipulation and precise examination.
| Type | Use |
|---|---|
| Fixed Stage | Suitable for stable specimens that do not require frequent adjustments. |
| Mechanical Stage | Facilitates precise movement of the specimen, allowing for controlled scanning and examination. |
Condenser: Illuminating the Microscopic Canvas
Positioned beneath the stage, the condenser is responsible for focusing and concentrating light onto the specimen. Adjustable diaphragms control the amount of light reaching the specimen, influencing contrast and brightness.
| Type | Use |
|---|---|
| Abbe Condenser | Commonly found in most microscopes, suitable for routine microscopy applications. |
| Darkfield Condenser | Enhances contrast by illuminating the specimen with oblique light, ideal for transparent or unstained specimens. |
| Phase Contrast Condenser | Utilized in phase contrast microscopy to visualize subtle differences in refractive indices within the specimen, making transparent structures visible. |
Light Source: Illuminating the Invisible
The light source, often located below or within the microscope, illuminates the specimen for observation. Understanding the various types of light sources aids in optimizing the illumination for clear and detailed imaging.
| Type | Use |
|---|---|
| Tungsten Bulb | Standard light source for routine microscopy, emitting a warm light suitable for most specimens. |
| LED | Energy-efficient alternative with adjustable intensity, providing cool and even illumination. |
| Halogen | Produces a bright and white light, ideal for demanding applications such as fluorescence microscopy. |
By comprehending the distinct uses of each light microscope part, from objectives to the light source, we unlock the potential to unravel the mysteries concealed within the microscopic world. These components work in harmony, enabling us to navigate the microcosm with precision and clarity.
How to use a light microscope: Follow these easy steps below
Light microscopes are powerful tools that open a window into the invisible world of the microcosm. Whether you’re a student, researcher, or enthusiast, mastering the art of using a light microscope is essential for unlocking the secrets hidden within tiny specimens.
Step 1: Setting Up the Microscope
Begin by assembling the microscope components. Follow these simple steps to ensure a proper setup:
| Action | Description |
|---|---|
| Place the microscope | Position the microscope on a stable surface with sufficient space for the stage and easy access to controls. |
| Adjust the light source | Ensure the light source is turned on and properly directed toward the condenser. |
| Set the objectives | Start with the lowest magnification objective in place, securing it in the revolving nosepiece. |
Step 2: Preparing the Specimen
Proper preparation of the specimen is crucial for obtaining clear and detailed images. Follow these steps:
| Action | Description |
|---|---|
| Place the specimen on the stage | Secure the specimen on the center of the stage using stage clips or a mechanical stage for precise positioning. |
| Adjust the focus | Use coarse focus to bring the specimen into view. Then, use fine focus for sharp and detailed focusing. |
| Choose the right objective | Select the appropriate objective lens based on the magnification needed for your specimen. |
Step 3: Navigating the Microscopic World
Once your specimen is in place, it’s time to explore the microcosm. Follow these steps for effective navigation:
| Action | Description |
|---|---|
| Use the stage controls | Manipulate the mechanical stage or stage controls to scan the specimen systematically. |
| Adjust the condenser and diaphragm | Optimize the condenser and diaphragm settings to control the amount and angle of light reaching the specimen. |
| Capture and record observations | Utilize the eyepiece and camera attachments to observe and document the microscopic details. |
Step 4: Care and Maintenance
Proper care ensures the longevity and efficiency of your light microscope. Follow these steps:
| Action | Description |
|---|---|
| Power off and unplug | After use, turn off the microscope and unplug it to conserve energy and prevent damage. |
| Clean the lenses | Use lens cleaning solution and lens paper to gently clean the objective and eyepiece lenses. |
| Store in a protective case | When not in use, store the microscope in a dust-free and secure case to prevent damage and contamination. |
By following these easy steps, you can confidently use a light microscope to explore the hidden wonders of the microcosm. Whether you’re a beginner or seasoned user, these guidelines will enhance your microscopy experience and ensure accurate observations.
Unlocking Clarity: Mastering Sample Preparation Techniques for Light Microscopy
Effective sample preparation is the cornerstone of successful light microscopy, enabling researchers to unveil the intricate details of specimens that would otherwise remain hidden. This comprehensive guide outlines key techniques, from fixation to troubleshooting, ensuring you achieve clear and detailed images.
Overview of Sample Preparation Methods for Light Microscopy
Before diving into the specific techniques, it’s essential to understand the diverse methods available for sample preparation in light microscopy. Different specimens may require tailored approaches. Here’s a brief overview:
| Method | Description |
|---|---|
| Wet Mount | A simple and quick technique involving placing the specimen in a liquid on a slide, covered with a coverslip. Suitable for live and unstained specimens. |
| Smear | Involves spreading a thin layer of the specimen onto a slide for examination, commonly used for blood or bacterial samples. |
| Sectioning | Used for solid specimens, involves slicing or sectioning the material thinly to allow light to pass through. |
| Fixation and Embedding | Preserves the structure of cells or tissues by fixing them in a solution and embedding them in a solid medium for sectioning. |
Fixation, Staining, and Mounting Procedures
Achieving optimal results in light microscopy often involves a sequence of crucial steps. Let’s delve into the procedures of fixation, staining, and mounting:
| Step | Description |
|---|---|
| Fixation | Immersing the specimen in a fixative, such as formaldehyde, to preserve its structure and prevent decay. |
| Staining | Introducing dyes or stains to enhance contrast and highlight specific structures or components within the specimen. |
| Mounting | Placing the prepared specimen on a glass slide and covering it with a coverslip using a mounting medium to secure and protect the specimen. |
Importance of Proper Sample Preparation in Obtaining Clear and Detailed Images
The quality of your microscopic images is directly influenced by the precision of your sample preparation. Understanding the significance of each step ensures that your observations are accurate and meaningful:
| Aspect | Importance |
|---|---|
| Preserving Structure | Fixation maintains the integrity of cellular structures, preventing distortion and decay during observation. |
| Enhancing Contrast | Staining enhances contrast, making specific features more visible and aiding in the identification of structures. |
| Securing the Specimen | Proper mounting ensures that the specimen remains in place during observation, preventing movement and blurring. |
Troubleshooting Common Issues in Sample Preparation
Even with meticulous care, issues may arise during sample preparation. Here are common problems and their solutions:
| Issue | Solution |
|---|---|
| Air Bubbles | Gently tap the coverslip to remove air bubbles, or use a fine needle to release trapped air along the edges. |
| Uneven Staining | Ensure uniform distribution of the stain and adjust staining times. Consider using different staining techniques. |
| Tissue Distortion | Review fixation procedures and ensure proper embedding. Experiment with alternative fixatives for better preservation. |
Tips and Best Practices for Optimal Results
Microscopy, an intricate dance between precision and curiosity, demands not just technical know-how but a nuanced approach. Elevate your microscopy experience with these tips and best practices that span from enhancing quality to avoiding common pitfalls.
৪ Tips for Enhancing the Quality of Your Microscopy Work
Quality microscopy requires attention to detail and a keen eye. Follow these tips to elevate the caliber of your observations:
| Tip | Description |
|---|---|
| Keep Lenses Clean | Regularly clean objective and eyepiece lenses using appropriate solutions to prevent debris and ensure clarity. |
| Calibrate Your Microscope | Periodically check and calibrate your microscope to ensure accurate magnification and reliable measurements. |
| Choose the Right Objective | Select the appropriate objective for your sample to achieve the desired level of magnification and clarity. |
| Adjust Illumination | Fine-tune the light intensity and focus to optimize illumination for your specific specimen. |
Best Practices for Efficient and Effective Microscope Use
Efficiency in microscopy not only saves time but also enhances the overall experience. Adopt these best practices for smooth and effective microscope use:
| Best Practice | Description |
|---|---|
| Start with Low Magnification | Begin observations with a low-magnification objective, gradually progressing to higher magnifications as needed. |
| Use Both Eyes | Utilize both eyes when looking through the microscope to enhance depth perception and reduce eye strain. |
| Keep Detailed Records | Maintain a detailed log of your observations, settings, and any abnormalities encountered for future reference. |
| Engage in Regular Maintenance | Conduct routine maintenance, including cleaning lenses and checking for loose parts, to ensure optimal performance. |
Common Pitfalls to Avoid in Light Microscopy
Navigating the world of microscopy comes with its share of challenges. Be mindful of these common pitfalls to safeguard against potential issues:
| Pitfall | Description |
|---|---|
| Inadequate Sample Preparation | Ensure thorough sample preparation to avoid distortion, artifacts, or misinterpretation of the specimen. |
| Ignoring Proper Illumination | Improper illumination can lead to poor image quality; adjust the condenser and diaphragm for optimal lighting. |
| Rushing Through Focusing | Patience is key; rushing through focusing can result in missed details. Take the time to achieve optimal focus. |
| Neglecting Regular Maintenance | Lack of regular maintenance can lead to equipment issues and compromise the quality of your microscopy work. |
Specialized Light Microscopy for Specific Samples
In the realm of light microscopy, specialized techniques tailored for distinct sample types open up new dimensions of exploration. These methods, each designed to address unique challenges, empower researchers to uncover intricate details in specific samples.
A. Fluorescence Microscopy: Illuminating the Invisible
Fluorescence microscopy is a powerful technique that involves using fluorescent dyes to label specific structures within a sample. When exposed to light of a specific wavelength, these labels emit fluorescence, allowing for detailed visualization. This method is particularly effective for studying live cells, cellular processes, and molecular interactions.
| Advantages | Applications |
|---|---|
| High Sensitivity | Cellular and molecular imaging |
| Multiplexing Capabilities | Protein localization and tracking |
| Live Cell Imaging | Dynamic processes within living cells |
B. Phase Contrast Microscopy: Revealing Transparency
Phase contrast microscopy enhances the contrast of transparent specimens by exploiting differences in refractive indices. This method is ideal for observing live cells, unstained biological materials, and other transparent samples without the need for elaborate staining procedures.
| Advantages | Applications |
|---|---|
| Detailed Observation | Live cell imaging |
| No Staining Required | Observation of unstained biological specimens |
| Improved Contrast | Transparent and low-contrast samples |
C. Differential Interference Contrast (DIC) Microscopy: Capturing 3D Structures
DIC microscopy, also known as Nomarski interference contrast, provides three-dimensional imaging by detecting changes in optical path length. It is particularly useful for studying highly transparent samples such as live cells, tissues, and subcellular structures.
| Advantages | Applications |
|---|---|
| 3D Imaging Capability | Observation of living cells and dynamic cellular processes |
| Enhanced Contrast | Visualizing transparent and low-contrast specimens |
| Improved Depth Perception | Detailed examination of cellular and subcellular structures |
D. Darkfield Microscopy: Unveiling Subtle Details
Darkfield microscopy employs oblique illumination to enhance contrast and visualize specimens against a dark background. This technique is valuable for highlighting fine details and observing transparent or unstained samples.
| Advantages | Applications |
|---|---|
| High Contrast | Observation of bacteria, live cells, and small organisms |
| Reveals Subtle Structures | Detection of small particles and fine details |
| Minimal Background Interference | Highlighting objects with low inherent contrast |
These specialized light microscopy methods offer a spectrum of possibilities for researchers aiming to study specific samples with precision and depth. Tailoring the technique to the nature of the specimen enhances the accuracy and richness of the observed data.
4 Things that are usually done wrong when using a light microscope:
1. You don’t adjust your lighting for different refractions (magnification) of samples in the case of complex specimens or if some elements on the material may have curved shapes, which will affect observation under certain conditions like condensation-coating, etc.
2. Be careful when adjusting the adjustable foot of a stage so that it doesn’t apply more pressure to harmful materials like paper and other non-supporting objects.
3. Don’t leave samples sit at room temperature; healthy specimens should always be observed in warm conditions, which would help maintain specimen clarity as well as tissue elasticity for examination better results or longer observation time under certain circumstances; however, do not keep them at extreme temperatures or immature specimens can be distorted.
4. Always use a typing liquid with most filtering materials to maintain the quality of samples (e.g., water or saline, ethanol), while using some critical or aggressive chemicals (such as acid) could potentially damage their structural integrity even if appropriately handled a light microscope often has glass slides on which various types specimen are placed for observation at certain times within an examination process.
Hence, it is essential that you check those glass slides for any contamination of the type or “changing color” that may be caused by non-organic materials, such as solvents (e.g., oils), oil pastes and their residues, etc.
What are the advantages of light microscopes?
Light microscopes are used to examine tiny objects in the form of a magnified image. They are used primarily for biological specimens, including cells and tissues, but can also be used on materials like crystals or minerals.
Advantages of light microscopes:
They can be cheaper than other microscopes because they don’t require a high-voltage source or bulky equipment.
Light microscopes have a lower resolution than other types of microscopes, meaning that more time is needed to produce an image, and there is less detail.
Light microscopes have better portability than most other microscopes because they don’t need a power source or bulky equipment.
Every time you need to work the microscopes, a Magnifying Lamp and control do not have to be taken out.
They can be mounted on different machines, including cameras, scanners, microtomes, and electron-optical traps.
Their magnification range varies from low (2x) to high (200x).
They are easy to use and have less noise than other microscopes.
What are the disadvantages of light microscopes?
Light microscopes are the most commonly used type of microscope in research labs and classrooms.
However, there are some disadvantages as well
Main disadvantages of light microscopes:
Objects can only be seen with a magnification of about 200, microscope slides are fragile and do not last long when placed under the microscope. Although I magnify by 500x, the sample is still just an extended hand for your eyes, you may want to consider binoculars (e.g., magic eye viewer) so that you can also see what’s in front of or behind.
The cases do not allow air circulation, and cloning gel or other conservant media has to be used. It takes a week before it reaches optimal condition when bacteria and fungi might have already destroyed the sample.
Light transmission can be uneven, meaning that certain parts of a specimen may be seen well and other factors not so well.
The most obvious problem is their light sensitivity: they (the microscope slides) are delicate and easily destroyed by strobe flashes which act as additional light sources once installed in your cock-pit. The best free book evaluating microscopic tissue samples for damage from laser radiation.
One person can go through the same scope at any given time, so it will force you to have to wait in order with somebody else if the room is not large enough.
These microscopes are more technical, and it comes down to the projector. Because they use light instead of visible light, they can project images on anything in the direct path of their lens.
You cannot use them to view the biological matter, as they require a live specimen. Light microscopes require that the sample be placed in aluminum foil which can lead to contamination issues if not done carefully and correctly.
Light microscopes are limited in the magnification range, especially when compared to scanning electron microscopes. Light microscopes require lenses because they do not focus light.
What is the difference between a light microscope and an electron microscope?
A light microscope is an optical microscope that uses an objective lens or 10X objective to magnify distant objects and illuminate them sufficiently for an observer to see them. This type of microscope must use illumination by transmitted or reflected light, not direct electromagnetic radiation. Light microscopes are used in industrial and scientific applications such as cell biology, biomaterials, histology, microbiology, and medical pathology.
An electron microscope uses a beam of electrons to illuminate specimens and images. Because the beam passes through many lenses (see below), a high-resolution image may be produced provided enough incident photons make it past lens elements, which usually is not an acceptable probability for objects at microscopic distances.
Also, because electron microscopes cannot view wide-angle fields of view or correct for chromatic aberrations in illumination sources like low-intensity incandescent light bulbs, whose wavelengths vary much during their useful lifetime, the resolution of an electron microscope is limited by what lenses can be included in the specimen-mounting apparatus.
Main difference between a light microscope and an electron microscope
Resolving power
An electron microscope has a resolving power of approximately 100,000 times that of a light microscope. This means that an electron microscope can see objects at a much smaller scale than a light microscope can.
Specimen preparation
Preparing a specimen with a light microscope takes approximately 10 minutes while preparing a sample with an electron microscope takes about 30 minutes.
Objective lens
A light microscope uses an objective lens with a wide aperture to collect light and magnify the image.
An electron microscope uses an objective lens with a narrow aperture that focuses electrons on the specimen, thereby providing high-resolution imaging of some objects that are too small for standard optical microscopes.
Maximum Magnification
Using the microscope helped you to see cells and bacteria better. Nowadays, scientists use several different types of microscopes to study other things. The electron microscope looks at tiny samples or pictures that cannot be seen with a light microscope.
Is a light microscope illuminated only with sunlight?
No, a light microscope is illuminated with a halogen lamp. Halogen lamps provide excellent illumination for both fluorescent and darkfield microscopy.
Halogen lamps are widely used in optical instrumentation due to their low heat output, compact size, and wide range of spectral results.
Resources and References
In the pursuit of mastering light microscopy, a wealth of knowledge is at your fingertips. Here are some recommended resources and references to deepen your understanding and refine your skills:
A. Books:
- “Molecular Biology of the Cell” by Bruce Alberts et al.
- This comprehensive textbook covers cell biology, including microscopy techniques, with clear explanations and illustrations.
- Link to the book
- “Microscopy Techniques” by M. A. Hayat
- An in-depth guide on various microscopy techniques, including light microscopy, electron microscopy, and their applications.
- Link to the book
B. Online Tutorials and Videos:
- MicroscopyU by Olympus Life Science:
- An extensive online resource offering tutorials, webinars, and interactive tools covering various microscopy techniques.
- MicroscopyU
- Khan Academy – Introduction to Cells:
- A free online course providing an overview of cell biology, microscopy, and the fundamentals of light microscopy.
- Khan Academy – Cells
C. Scientific Journals:
- “Journal of Microscopy”
- A peer-reviewed journal publishing articles on the theory and practice of microscopy.
- Journal Homepage
- “Microscopy and Microanalysis”
- A journal covering a broad range of microscopy techniques and applications.
- Journal Homepage
D. Research Papers:
- “Principles and Applications of Light Microscopy” by B. J. Berland et al.
- A seminal paper discussing the principles and applications of light microscopy.
- Link to the paper
- “Fluorescence Microscopy: A Concise Guide” by P. J. Verveer et al.
- An informative paper on the principles and applications of fluorescence microscopy.
- Link to the paper

I am an enthusiastic student of optics, so I may be biased when I say that optics is one of the most critical fields. It doesn’t matter what type of optics you are talking about – optics for astronomy, medicine, engineering, or pleasure – all types are essential.
Table of Contents
Pingback: How to Use a Microscope - Tips, Tricks, and Resources to Get Started!
Pingback: 5 Ways to Improve Microscope Resolution: Video Guide Explained
Pingback: Which Organelle is Visible under Light Microscope: Proper Observation and Identification
Pingback: which is the most Reliable Microscope for Coin Collectors and Numismatists
Pingback: Can a Light Microscope See Viruses
Pingback: 5 Most Popular Discovery Channel Smartphone Microscope: The Ultimate Video Guide Explained
Pingback: 5 Most Popular Weed Microscope: Comparison with Video Guide
Pingback: How the Richter Optica MDS1 Middle School Microscope Enhances Classroom Learning